Internet
Quick overview of the Internet connection options
Netcraze router devices are primarily targeted to reliably connect to the Internet — via Ethernet or optical fibre line, over wireless ISP's Access Point or DSL line, and also via 3G/4G/LTE mobile network.
One can combine a Netcraze device with any PON terminal or an xDSL-to-Ethernet modem that was preinstalled by ISP as well.
Following is an overview of the various means of Internet connectivity that Netcraze routers support.
Leased line Internet connection
Any of the Netcraze models feature a robust Internet connection over a dedicated Ethernet line. Following types are supported: IPoE (this is the most common type of 'plain' Ethernet connection, with no login and password used for ISP authentication), or authentication types - PPPoE, PPTP, L2TP and 802.1x. Virtual network tag-based VLAN 802.1q is supported, and all of the connectivity types mentioned provide IPv4/IPv6 access. A Netcraze and a PON terminal can be used together for the expansion or additional protection of a home network.
Internet connection via Wi-Fi (WISP)
One might need to connect an existing home network to the Internet via Wi-Fi. That may be the case of your ISP' aerial Access Point, your loyal neighbour's wireless, an open network at a nearby cafe, or an emergency backup connection to a hotspot on a mobile phone when the primary ISP fails.
When travelling with many gadgets, WISP mode makes a convenient way for connecting to a hotel Wi-Fi network. Simply enter the hotel wireless system credentials into the Netcraze WISP configuration. All your mobile devices won't require even changing their settings to access the Internet, being already connected to your Netcraze device's pre-configured secure Wi-Fi access point.
Access via ADSL / VDSL
The DSL models are equipped with a built-in ADSL2+/VDSL2 modem, enabling you to connect to the Internet via the DSL lines. These Netcraze routers are a dedicated xDSL solution without the need for external modems and routers, featuring 802.11n or a premium 802.11ac wireless access point.
Connecting to multiple ISPs and an Internet channel reservation
With a Netcraze router, it is possible to take advantage of multiple ISP connections simultaneously (network topology like that would be called Multi-WAN). For example, you can set up basic connection redundancy by utilising two Ethernet cables from separate ISPs. If the primary provider's network fails, Netcraze will automatically switch over to a backup channel. The Multi-WAN function is supported by all of the Netcraze models with no exception.
Note
Before you connect, please refer to the following checklist. Setting up your router might require that the connection details are available (usually, that kind of info would be possible to obtain from an internet service provider's technical support service or is already included in the contract appendices):
Whether the login (user name) and password are used to access the Internet;
If a login and password are required, access protocol must be specified; it commonly is either of those — PPTP, L2TP or PPPoE;
When connecting by PPTP or L2TP protocols, the IP address or domain name of the VPN server is also required;
In many cases, it is useful to know whether the IP address from ISP is a permanent assignment or a dynamic one, and what's more important, whether it is a direct public address or a masqueraded IP;
If you are assigned a permanent (static) IP address, it is needed to know this address, as well as other IP parameters (subnet mask, default gateway, and ISP's DNS server address) to complete configuration manually;
Sometimes, ISPs register the MAC address of your side of the line (it is often called the
CPE MAC lockdown). If that is the case, it is useful to know which MAC address is registered with your ISP and whether it can be changed. If your ISP contract strictly specifies the MAC address of another device, such as your computer, we recommend that you inform the technical support service of the MAC address of the router printed on its label before connecting. The need might be, Netcraze routers allow Changing the WAN MAC address of the device during the connection setup process.
Wired
Internet connection via Ethernet
Netcraze routers allow you to set up an Internet connection over a leased Ethernet line using any connection type: IPoE, PPPoE, PPTP, L2TP, 802.1x, VLAN 802.1q, IPv4/IPv6.
It is also possible to connect to the Internet via a PON terminal or xDSL/DOCSIS/Cable modem with an Ethernet port, in a case, for example, of a pre-installed ISP hardware.
An Ethernet cable from the ISP, conforming to at least 5e category, not exceeding 100 meters in length and lugged with a standard 8-pin RJ-45 connector, should be laid out to where the router will be placed. This cable should normally be connected to router port 0 (WAN/Internet).
Important
If your contract with the ISP mentions the MAC address of another device, such as your computer, then before connecting the Ethernet line cable, it is advisable to notify your ISP that another device will be used that has a different hardware address. State the Netcraze's WAN MAC address printed on its label. Alternatively, it is possible to spoof (substitute) the device MAC address with the one your ISP has registered during the connection setup process (you can do this by following the 'Changing the WAN MAC address' instructions).
The most widespread and easily configurable Internet connection type is the IPoE (Internet Protocol over Ethernet), sometimes referred to as a 'dedicated' or 'leased line connection'. This method does not suppose a login and password authentication to access the Internet. All you need to do is connect the ISP cable to port 0 of the router. After that, any home device connected to its Wi-Fi network or one of the remaining Ethernet ports will access the Internet. As per that, no additional configuration is required.
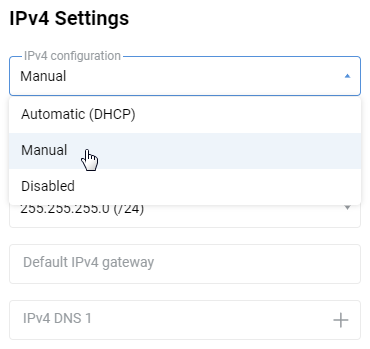
In some cases, however, your ISP would assign a static public IP address for you; it must then be specified in your router settings. To accomplish that, go to the 'Ethernet Cable Connections to Internet' page of Netcraze's web interface. In the 'IPv4 Settings' section, set the 'IPv4 configuration' to 'Manual'.
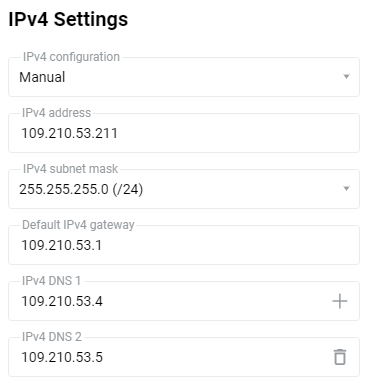
Then enter the address provided by your ISP in the 'IPv4 address' field.Your ISP must supply other IP parameters (subnet mask, gateway addresses, and DNS) along with a static IP address for manual configuration; please specify them in the appropriate fields. For example:
Changing a WAN MAC address
Some ISPs restrict Internet access to only one device by registering its MAC address. Usually, a user gives the ISP the MAC address of his computer's network adapter. In this case, the Internet can only be accessed from this MAC address.
If that is actually the case and you know the MAC address that's registered with your ISP — it may be the address of your previous router device, or your PC's network adapter, or MAC is just printed out in the contract, it is then possible to substitute the factory MAC of your Netcraze with the necessary MAC address that your ISP would accept.
Tip
If your contract with the ISP includes the MAC address of another device, such as your computer, we recommend informing ISP service of the WAN MAC address of the router. Netcraze WAN MAC is printed on the device label. That must be done before connecting the Ethernet line cable.
Instead, to spoof the MAC address of your Netcraze device with the one already registered, please follow the below step.
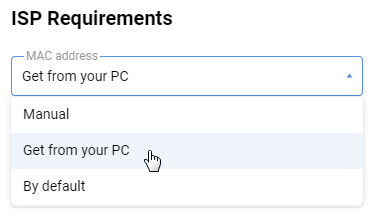
On the 'Ethernet Cable Connections to Internet' page, under 'ISP Requirements', please select one of the options in the MAC address field:
'By default' — the default factory setting, the WAN MAC address specified on the product label will be used;
'Get from your PC' — the WAN MAC address of your router will change to the MAC address of the Network Interface Card of the computer from which the web interface is opened. The 'Get from your PC' option is only possible when your computer is connected via Ethernet cable;
'Manual' — manually specify the MAC address to be used as the WAN MAC address.
You can find the Windows PC's MAC address by following the instructions 'How to check the network adapter settings in Windows'.
Internet connection via PPPoE
PPPoE is most commonly used when connecting to the Internet over ADSL / VDSL, but sometimes this connection type is also used by ISPs providing Internet over a dedicated Ethernet line.
On the 'Ethernet Cable Connections to Internet' page, under 'ISP Authentication (PPPoE)', enter 'PPPoE' in the 'Type (protocol)' field.
Then, in the 'Username' and 'Password' fields, enter the login and password for the Internet connection provided by your ISP.
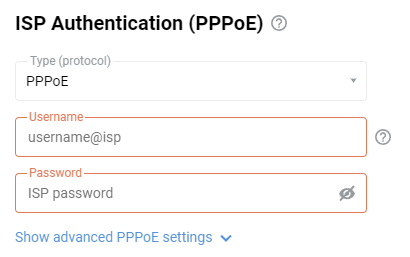
Click on 'Show advanced PPPoE settings' to display fields with advanced settings.
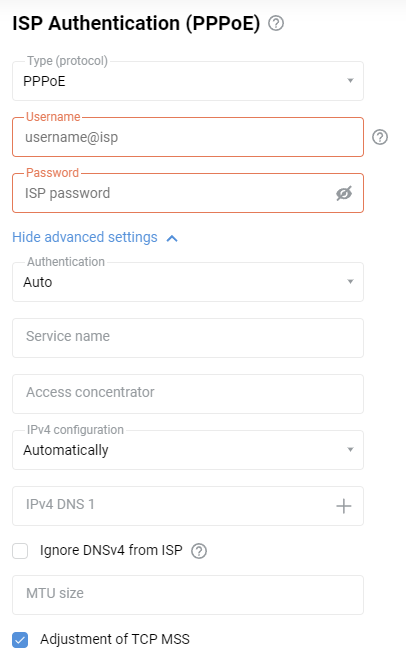
The 'Service name' and 'Access concentrator' fields are optional; leave them blank if your provider has not given you additional information.
Leave the 'IPv4 configuration' field set to 'Auto' if your ISP automatically assigns an IP address for Internet access.
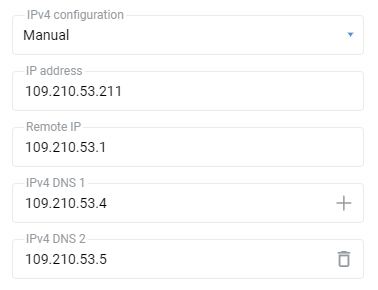
If your ISP has provided you with a fixed (static) IP address, select 'Manual' in the 'IPv4 configuration' field and specify the IP address and gateway address in the fields 'IP address' and 'Remote IP' that appear. For example:
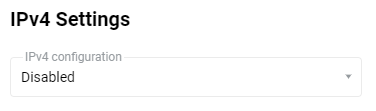
If your ISP neither issues nor requires an IP address to be assigned to your router's WAN interface, i.e. if its network does not have automatic IP address assignment, disable automatic IP address acquisition via DHCP on the WAN port. To do this, in the 'IPv4 Settings' section of the 'IPv4 configuration' field, specify 'Disabled'.
Internet connection via PPTP/L2TP
PPTP and L2TP are often used in ISP networks. The main advantage of these protocols is the security of data transmission to the Internet. Below we will consider an example of setting up a connection via PPTP protocol as the most common one. The L2TP connection is configured in the same way.
On the 'Ethernet Cable Connections to Internet' page in the 'ISP Authentication (PPPoE / PPTP / L2TP)' section, in the 'Type (protocol)' field, specify the value 'PPTP' or 'L2TP', depending on what type of connection you want to configure. In the 'Server address' field, enter the IP address or domain name of the PPTP or L2TP server. In the 'Username' and 'Password' fields, enter the login and password provided by your ISP for connecting to the Internet, respectively.
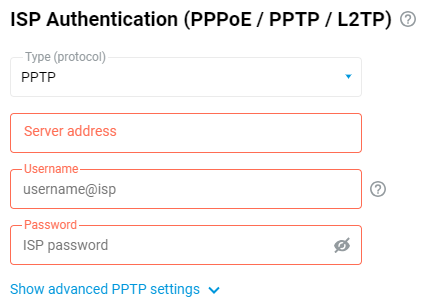
Click on 'Show advanced PPTP settings' to display fields with advanced settings.
If the PPTP connection uses data encryption (MPPE), enable the corresponding option.
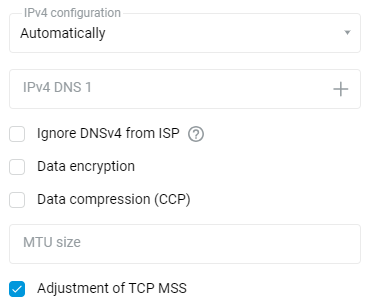
Leave the 'IPv4 configuration' field set to 'Automatically' if the IP address for Internet access is assigned automatically by your ISP.
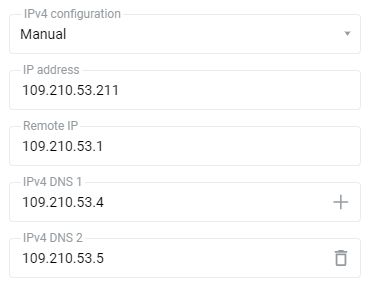
If your ISP has provided you with a fixed (static) IP address, specify 'Manual' in the 'IPv4 configuration' field and specify the IP address and gateway address in the fields 'IP address' and 'Remote IP' that appear. For example:
Setting up an IPTV connection
In Netcraze routers, in most cases, digital television (IPTV) works right out of the box on both computers and set-top boxes.
Multicast is used to provide IPTV services. Ensure that your Netcraze has the 'IGMP/PPPoE proxy service' component installed, which transmits IGMP/PPPoE messages between different interfaces. This can be done on the 'General System Settings' page in the 'NDMS Update and Component Options' section by clicking on 'Components options'.

Set up an Internet connection and connect the set-top box or computer on which you plan to watch TV to any of the router's network (LAN) ports assigned to the Home segment. Check that IPTV is working properly.
Some ISPs, when using the MAC address registration of the set-top box, require a special TV port on the router to which the set-top box should be connected. This port directly connects to the provider's network and allows the provider to see the set-top box's MAC address. To set one of the network ports belonging to the Home segment in the TV port mode, please refer to the following configuration methods:
Go to the 'Ethernet Cable Connections to Internet' page; in the 'Ports and VLANs' section, set the 'TV set-top box' mode for the port to which the IPTV set-top box will be connected (in our example, the set-top box will be connected to
port 3).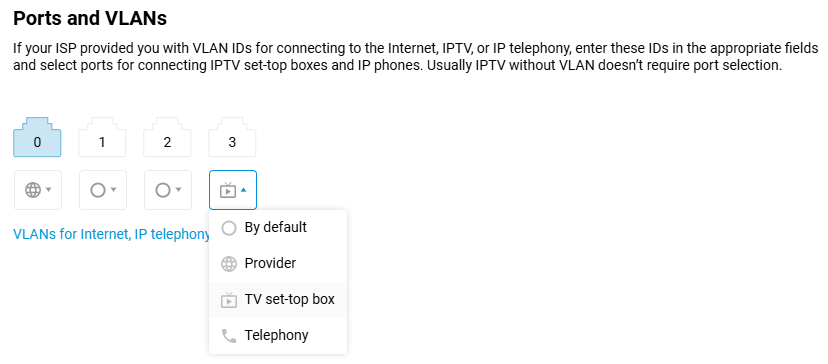
If your ISP has provided you with a VLAN for an IPTV service, enter it in the 'TV' field. If IPTV is provided without a VLAN, you usually do not need to select a port for the set-top box.
When you make these settings, the set-top box will connect directly to the ISP's network through a router. Connect the IPTV set-top box to the TV port and reboot it. The set-top box must obtain an IP address from your ISP's network, and then you can receive digital television.
The above steps are usually enough to receive IPTV.
A Netcraze router also allows fine-tuning for non-standard connection scenarios, for example, which use a different interface for IPTV service.
It is necessary to have a component of the system 'IGMP/PPPoE proxy service' installed in the router as it was written above. The IGMP proxy service retransmits a multicast stream from the ISP to the home network devices. Multicast is used to provide IPTV service.
Go to the 'Home segment' page in the 'IGMP Proxy' section. The default settings on this page are suitable for most service providers.
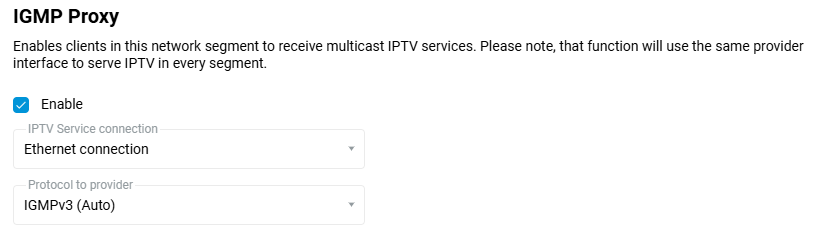
By default, the 'IPTV Service connection' field specifies the interface that looks into the provider's network (in our example, it is 'Ethernet connection') and where IPTV will come from.
Important
If you use a Mesh Wi-Fi System and organise network extension using extenders, make sure that the ‘IGMP/PPPoE proxy service’ component of the system is installed on them, otherwise the extenders will not be able to transmit multicast streams and therefore IPTV will not work on devices connected to the extenders.
Tip
If the above steps have not been successful, please check the IPTV functioning on the ISP's side by connecting the set-top box or the computer on which you plan to watch TV directly to the ISP's cable, i.e. without using your Netcraze. If the television is working in this case, but not through the Netcraze, please get in touch with our support team. Please specify your city, the name of your provider and a tariff plan, provide a link to the instructions for setting up IPTV of your provider for the recommended routers, as well as attach the Netcraze diagnostic file, receiving it according to the instruction 'Saving the self-test system file'.
Also note that firewalls and some antivirus software used in your network or installed on your computer may block multicast traffic. If, for some reason you don't have IPTV working, try temporarily disabling them.
Sometimes there are questions related to connecting and arranging IPTV over Wi-Fi. Some ways of connection are presented in the article: 'IPTV over Wi-Fi'.
DSL connection
Internet connection via ADSL
You can connect to the Internet via a telephone line with ADSL service using Netcraze Orbiter 6 (NAP-630) router. It is equipped with a built-in ADSL2+/VDSL2 modem, which allows you to connect to the Internet using DSL technologies without any external modems or routers. The ADSL connection can be used as a primary or backup connection, which can be activated automatically in case of problems on the main Internet access channel.
Note
Netcraze Orbiter 6 (NAP-630) support ADSL2+ Annex M mode. This mode is a part of the ADSL2+ standard and it increases the upstream speed (data transfer rate to the provider). This ADSL2+ Annex M mode is activated automatically, provided that it is activated on the ISP side.
Connect your telephone line to the RJ-11 socket on the router. Be sure to use microfilters or DSL splitters to connect all telephones to the telephone line; this will isolate the modem from the interference a phone creates on the line while protecting the phone from high-frequency modem signals. Microfilters and splitters do not affect the phone's operation, and if properly connected, the phone should work the same way as before they are installed.
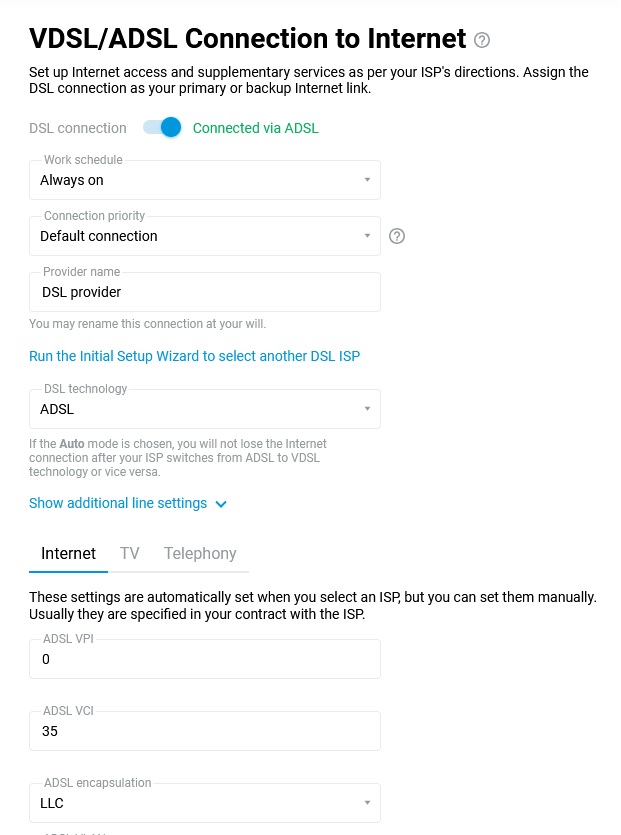
Go to the VDSL/ADSL Connection to Internet page. In the DSL technology field, select ADSL.
Below, specify the settings for your Internet connection.
Important
The VPI, VCI values, username and password for Internet access are usually specified in the contract between a subscriber and ISP.
In the Internet tab, it is necessary to set the values for ADSL VPI, ADSL VCI and ADSL encapsulation. In our example, the VPI/VCI values are 0/35, and the encapsulation is LLC.
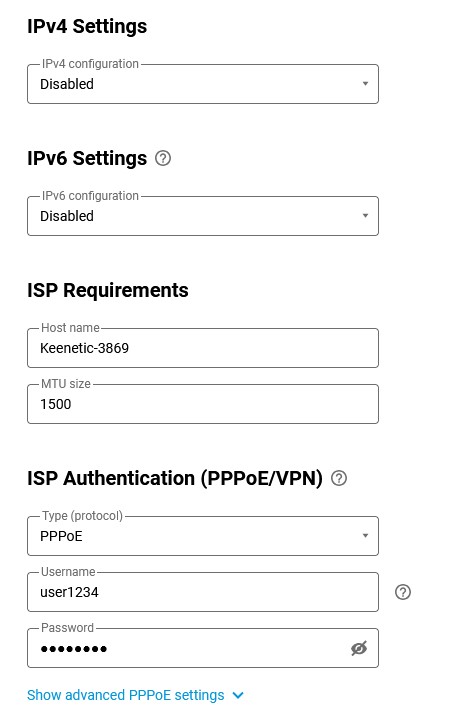
Next, on the same page, in the IPv4 configuration and IPv6 configuration fields, select Disabled, as it is not required to assign an IP address on this virtual channel.
PPPoE authentication will be used to connect to the Internet. In the ISP authentication (PPPoE/VPN) section, specify PPPoE in the Type (protocol) field. In the Username and Password fields, type in the values provided by your ISP for connecting to the Internet.
Click Show advanced PPPoE settings to display the fields with additional parameters.
For more information on configuring PPPoE, see the article Internet connection via PPPoE.
It's also worth reading the following information:
Internet connection via VDSL
You can connect to the Internet via a telephone line with VDSL service using Netcraze Orbiter 6 (NAP-630) router. It is equipped with a built-in ADSL2+/VDSL2 modem, which allows you to connect to the Internet using DSL technologies without any external modems or routers. The VDSL connection can be used as a primary or backup connection, which can be activated automatically in case of problems on the main Internet access channel.
Important
Netcraze Orbiter 6 (NAP-630) supports Client Mode only and does not allow VDSL connectivity between two routers.
Connect the telephone line to the RJ-11 socket on the router. Be sure to use microfilters or DSL splitters to connect all telephones to your telephone line; this will isolate the modem from the interference phone creates on the line while protecting the phone from high-frequency modem signals. Microfilters and splitters do not affect the phone's operation, and if properly connected, the phone should work the same way as before they are installed.
Go to the VDSL/ADSL Connection to Internet page. In the DSL technology field, select VDSL.
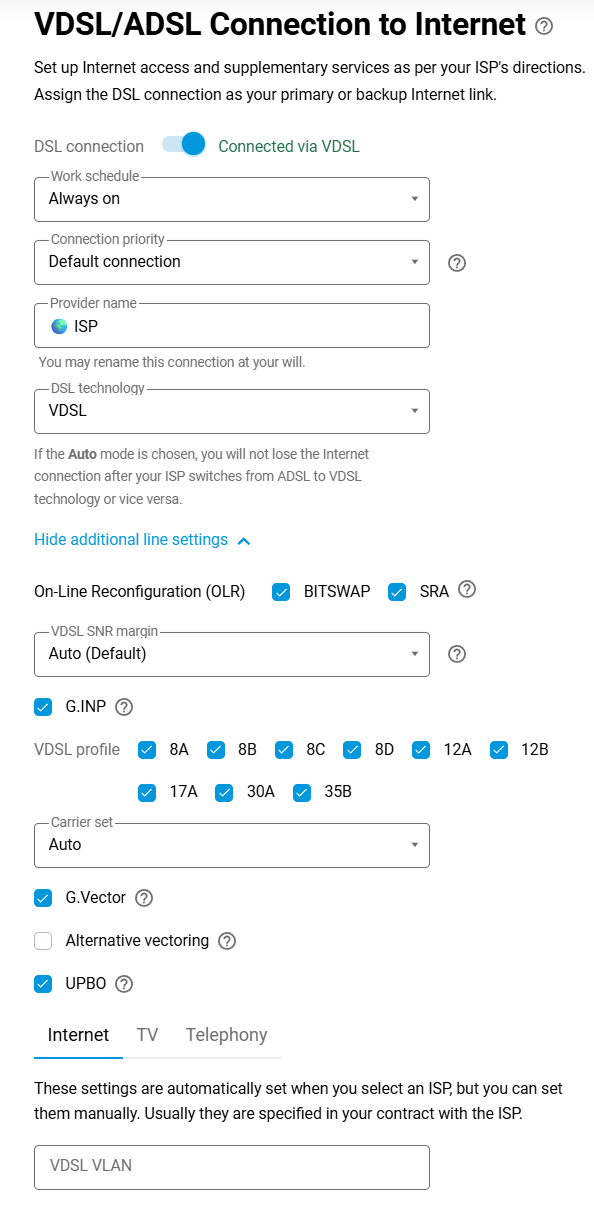
Next, on the same page, in the IPv4 configuration and IPv6 configuration fields, select Disabled, as it is not required to assign an IP address on this virtual channel.
PPPoE authentication will be used to connect to the Internet. In the ISP authentication (PPPoE/VPN) section, specify PPPoE in the Type (protocol) field. In the Username and Password fields, type in the values provided by your ISP for connecting to the Internet.
Important
The username and password for Internet access are usually specified in the contract between the subscriber and the ISP.
Click Show advanced PPPoE settings to display the fields with additional parameters.
For more information on configuring PPPoE, see the article Internet connection via PPPoE.
It's also worth reading the following information:
Not
Netcraze VDSL & ADSL Hızlı Kurulum videolarına aşağıdan erişebilirsiniz:
Web Arayüz ile Kurulum
Mobil Uygulama ile Kurulum
Wireless ISP
Internet connection via Wi-Fi (WISP)
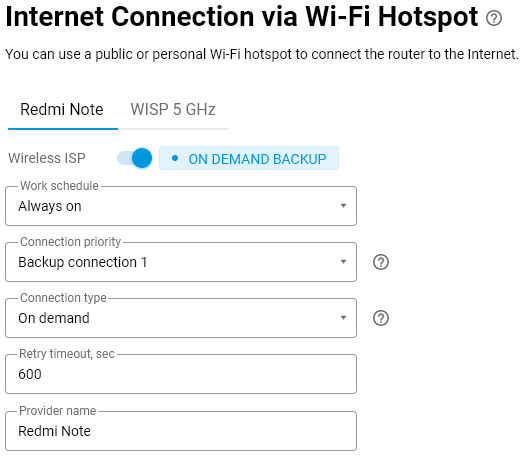
If you need to connect your home network to the Internet via a Wi-Fi link, every model of Netcraze router allows that with a WISP (Wireless ISP) mode connection. You can connect, for example, to ISP's public Wi-Fi hot spot, your neighbour's Wi-Fi network, a wireless AP in a nearby cafe, or to a mobile hot-spot on your smartphone. When travelling, WISP mode is convenient to use with a hotel Wi-Fi network. Your Netcraze connects to the hotel's Wi-Fi, and all your mobile devices are good to go, already being connected to a pre-configured, secure Wi-Fi network of your router.
The WISP connection can be used as a primary or backup connection, which is automatically activated in case of problems with the main Internet access channel.
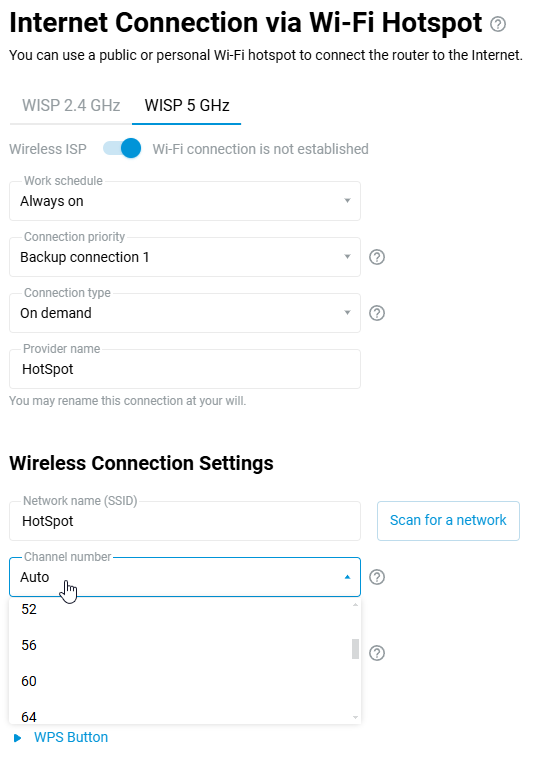
This type of Internet connection is set up on the Wireless ISP page.
On the Wireless ISP page, click Scan for a network to select the desired wireless network.
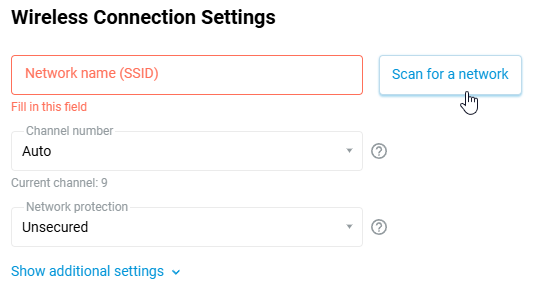
The window that appears display the available Wi-Fi networks within reach of the router. Please select the desired network by clicking on it.

This will take you back to the Wireless ISP page.
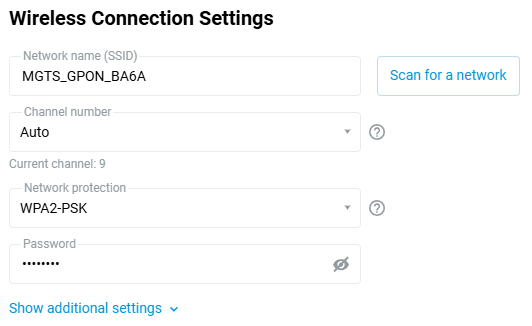
When selecting a wireless network, the Network Name (SSID) field and Network protection selector are set automatically. In the Password field, you must enter the password or the security key used to access the selected Wi-Fi network.
Tip
NDMS provides the option to set the MAC address of the access point (it is also called BSSID) to connect to in WISP mode. This feature is useful if there are access points broadcasting the same network name (SSID) on the radio. You can select a specific connection point of the infrastructure by manually entering its MAC address. For more information, see MAC address of the access point (BSSID) for WISP connection.
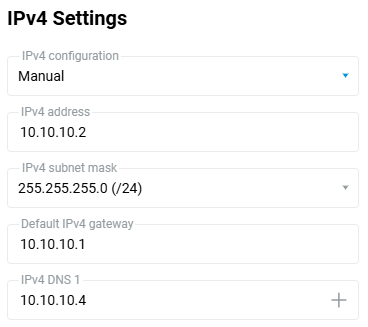
By default, IPv4 settings are set to automatic, i.e. the device will try to obtain an IP address via the DHCP protocol upon connection to the upstream access point. If you want to set a static IP address, gateway and DNS servers, please specify those in the corresponding fields which are uncovered by selecting Manual in the IPv4 configuration drop-down selector. For example:
Tip
The IP addresses on the router's Home segment (default network assignment for this segment is 192.168.1.x) and those received from the Internet service provider or an uplink access point must belong to different subnets. Otherwise, an IP address conflict will occur, and there will be no access to the Internet.
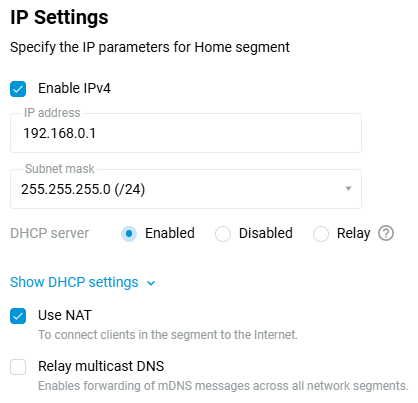
To change the local IP address of your Netcraze, go to the Home segment page, and in the IP settings section, fill in the IP address field — enter a private IP address other than 192.168.1.1 (e.g., enter 192.168.0.1). Apply settings by clicking the Save button.
Important
After you change your router's IP address, you will lose access to its web interface. To regain access, you need to update the IP address of the network adapter by unplugging the network cable from the adapter for a minute. Then make sure that the IP address on the network adapter has been assigned from the new subnet and that the Netcraze web interface is accessible from the new local IP address. For more information, see How to check the network adapter settings in Windows.
Set the Internet connection switch to the right (On) position to start the Wireless ISP connection.
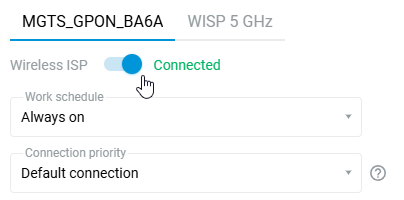
After successful connection, in the Internet information panel on the System dashboard home page will display information about the current connection.

The Wireless ISP connection can be used as a primary or for a backup.
When using connection backup, and the Wireless ISP connection is configured as the primary connection, on the same page, you can enable Internet availability checking (Ping Check). Then, even if the connection to an AP remains, but the Internet connectivity is actually lost somehow, Ping Checker will get around that and automatically switch the router to a backup connection.
Important
If the WISP connection is not used all the time, it is recommended to disable it. If you leave WISP enabled on the router and turned off the Wi-Fi access point to which the connection was established, the router will constantly scan the radio for the access point specified in the settings. This process will take time for the radio module to work, which can have a negative effect on Wi-Fi network performance.
Note
With NDMS 3.8.2, the new Channel number option for Wireless ISP connection has been added, which allows you to set a specific channel number instead of automatically selecting a channel based on SSID. This option greatly reduces the time it takes for the router's client side to scan the air, leaving more resources for Wi-Fi hand-offs and the mesh Wi-Fi backhaul to work. Use this option for scenarios where the upstream access point providing the Internet has a fixed Wi-Fi channel number.
The Wi-Fi access point on the router and the embedded WISP client share the same radio module (we are talking about the same band), and it is hardware impossible to make the embedded WISP client work on different channels with the Wi-Fi access point. For example, a remote ISP access point is running on wireless channel 48; if you manually set channel 149 on your Wi-Fi access point, you will not be able to connect via WISP to the ISP access point that is running on channel 48 (this is only possible within the different 2.4 and 5 GHz bands, in which case different radio modules are used). If you set the Auto mode for channel selection on the access point, the WISP client will always follow the remote Wi-Fi access point and become the ‘master’ for its access point. At the same time, the Wi-Fi access point on your router becomes a ‘slave’ and also switches to the channel set by the WISP client.
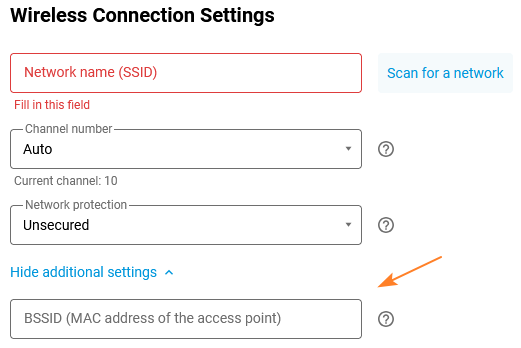
MAC address of the access point (BSSID) for WISP connection
NDMS allows you to specify the MAC address of the access point (BSSID) when connecting in Wireless ISP (WISP) mode. This feature is useful when there are several access points with the same name (SSID) on the air. In this case, you can select a particular access point for connection by manually specifying its MAC address.
In the router's web interface, this setting is located in the Wireless ISP menu on the Internet Connection via Wi-Fi Hotspot page. In dual-band router models (2.4/5 GHz), this setting is available in both bands.
Go to the Internet Connection via Wi-Fi Hotspot page and click on Show advanced settings in the Wireless Connection Settings section. In the BSSID (MAC address of the access point) field that appears, enter the MAC address of the access point you want to connect to.
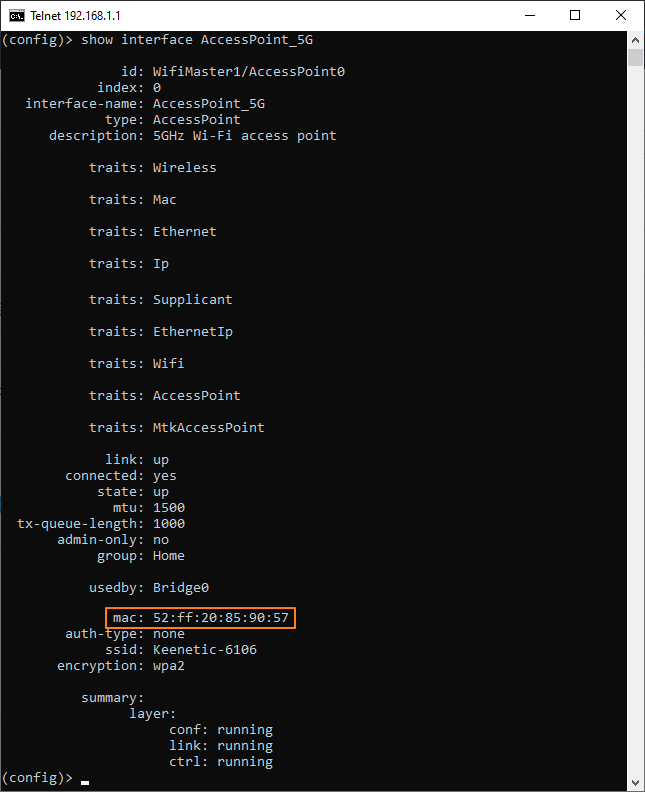
If you connect via WISP to another Netcraze device, run the following command on it to find the MAC address of the Wi-Fi access point, which you need to enter in the BSSID field. For a 2.4 GHz network:
show interface AccessPointFor the 5 GHz network:
show interface AccessPoint_5GYou can execute the command from the web interface (web CLI) or via a telnet connection. For detailed information, please refer to the instructions Command-line interface (CLI).

Other connections
With a Netcraze router, you can connect to a public VPN service, office network, or other Netcraze through any Internet connection. Some ISPs provide access to the Internet using VPN technology.
In terms of compatibility, you can connect via PPTP, OpenVPN, L2TP/IPsec (L2TP over IPsec), SSTP, OpenConnect or IPsec client from any Netcraze router.
Having such a universal VPN client is especially useful if there is no public IP address on one side of the network connection (for example, to access the country house from your apartment).
In addition to the VPN client function, any, even the entry-level Netcraze model, has similar VPN servers in its arsenal: PPTP, OpenVPN, L2TP/IPsec, SSTP, OpenConnect, IPsec (Virtual IP).
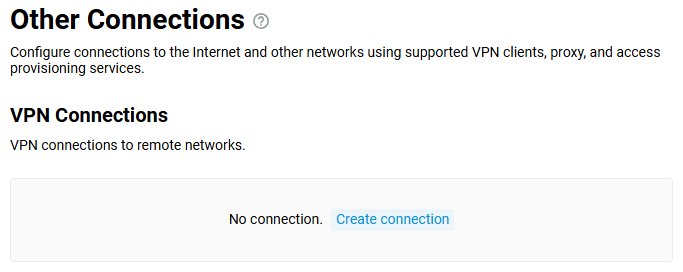
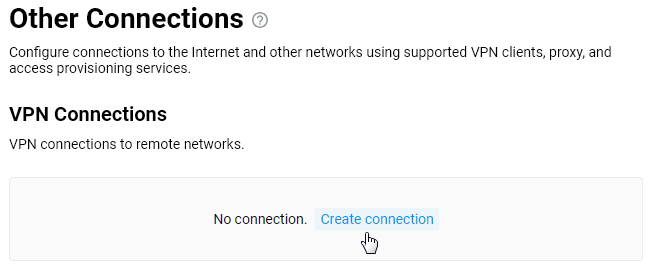
You can configure VPN connections to remote networks and VPN servers on the Other Connections page.
In the VPN Connections section, click Create connection.
In the VPN Connection Settings window, select the required protocol in the Type (protocol) field and then configure the connection.

Detailed information on how to set up connections can be found in the articles:
Tip
If you want to use the newly created connection to access the Internet, set the highest priority to this connection. You will find information about the priorities in the 'Connection priorities' article.
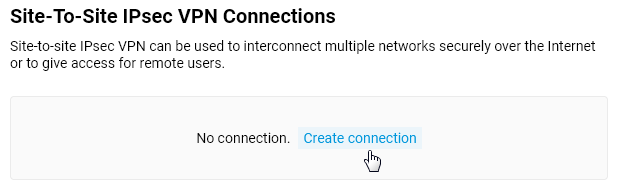
To create an IPsec VPN in the Site-To-Site IPsec VPN Connections section, click Create connection.
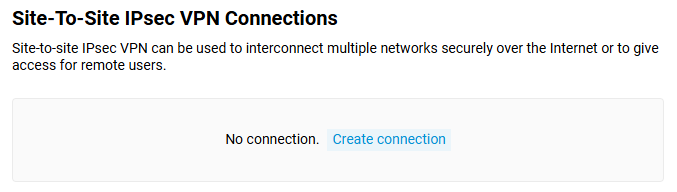
Then specify connection parameters in the Site-to-site IPsec VPN Connection Setup window.
An example of how to interconnect two local networks over the Internet via IPsec can be found in the article 'IPsec VPN site-to-site'.
VPN types on your device
VPN (Virtual Private Network) — a generic name for technologies that provide one or more network connections (tunnels) over another network (e.g., the Internet).
There are many reasons for using virtual private networks. The most common of these are security and data privacy. The confidentiality of original user data is guaranteed using data protection tools in virtual private networks.
It is known that IP (Internet Protocol) networks have a 'weak point' due to the structure of the protocol. There are no means of protecting the transferred data and no guarantee that the sender is the one he claims to be. The data in an IP network can be easily tampered with or intercepted.
We recommend using a VPN connection to connect from the Internet to your home server, USB flash drive files connected to a router, DVR, or a computer desktop through the RDP protocol. In this case, you don't have to worry about the security of the transmitted data because the VPN connection between the client and the server is usually encrypted.
Netcraze devices support the following types of VPN connections:
PPTP/SSTP
L2TP over IPSec (L2TP/IPSec)
WireGuard
OpenVPN
IPSec
IKEv2
OpenConnect
GRE/IPIP/EoIP
IPSec Xauth PSK (Virtual IP)
With the help of a Netcraze router, your home network can be connected via a VPN to a public VPN service, office network, or another Netcraze device, regardless of Internet connection type.
VPN clients/servers for secure access (PPTP, L2TP over IPSec, IKEv2, Wireguard, OpenVPN, SSTP, OpenConnect) as well as tunnels for network interconnection (Site-to-Site IPSec, EoIP (Ethernet over IP), GRE, IPIP (IP over IP) are implemented in all Netcraze devices.
Depending on the protocols used and the purpose, a VPN can provide connections in different scenarios: host-host, host-network, hosts-network, client-server, clients-server, router-router, routers-router (VPN concentrator), network-network (site-to-site).
If you don't know what type of VPN to choose, the tables and recommendations below will help you.
VPN type | Client | Server | Hardware acceleration | Number of simultaneous connections |
|---|---|---|---|---|
PPTP | + | + | - |
|
SSTP | + | + | - |
|
OpenConnect | + | + | - |
|
L2TP over IPSec | + | + | + |
|
WireGuard | + | + | - | up to 32 |
IPSec | + | + | + | no limitation |
IKEv2 | + | + | + | up to 32 |
GRE / IPIP / EoIP | + | + | - | up to 128 |
OpenVPN | + | + | - | |
IPSec Xauth PSK | - | + | + | up to 32 |
* — in the Starter, Runner 4G, Launcher, Explorer, Carrier models, only the AES algorithm acceleration is used, and in Skipper, Titan, Hero, Giant, Peak, Hopper the entire IPSec protocol hardware acceleration is used.
** — up to 200 for Hero, Peak and Titan; up to 150 for Carrier DSL; up to 100 for Starter, Launcher, Explorer and Carrier.
*** — from NDMS 3.7 the number of WireGuard connections is increased to 128 for for ARM-based models (KN-2710, KN-1811, KN-1012, KN-3811, KN-3812), and to 48 for KN-1011, KN-1810, KN-1912, KN-2311, KN-2610 and KN-3013.
**** — before NDMS 3.3, the limit was 10 connections for Hero (KN-1011), Titan (KN-1810), and 5 for all other models.
Important
The number of client connections is limited by the dedicated service storage space (24 Kbytes) for VPN configurations. This is especially important for OpenVPN connections, as the total size of their configurations should not exceed 24 Kbytes.
For modern Netcraze models the size of storage, where startup-config configuration file and environment variables (including keys) are placed in compressed form, has been increased to 260 Kbytes to 2 Mbytes (depending on the model).
VPN type | Difficulty level | Level of data protection | Speed | Resource intensity | OS integration |
|---|---|---|---|---|---|
PPTP | for ordinary users | low | average | low | Windows, macOS, Linux, Android, iOS (up to and including v9) |
SSTP | for ordinary users | high | average, low operating via the cloud | average | Windows |
OpenConnect | for ordinary users | high | average, low operating via the cloud | average | not available |
L2TP over IPSec | for ordinary users | high | high | high | Windows, macOS, Linux, Android, iOS |
WireGuard | for advanced users | very high | high | low | not available |
IPSec | for professionals | very high | high | high | Windows, macOS, Linux, Android, iOS |
IKEv2 | for ordinary users | high | high | high | Windows, macOS, Linux, iOS |
OpenVPN | for advanced users | very high | low | very high | not available |
IPSec Xauth PSK | for ordinary users | high | high | high | Android, iOS |
* — you will need to install additional free software in Windows, macOS, Linux, Android, iOS operating systems to set up the connection.
** — values are relative, not the exact figures, because speeds for VPN connections depend on models and several factors - the type of encryption algorithms used, the number of simultaneous connections, the type of the Internet connection, the speed and the load of the Internet channel, the load on the server and other factors. Let's consider low speed up to 15 Mbit/s, average speed around 30 - 50 Mbit/s, and high speed — over 70 Mbit/s.
VPN type | Advantages | Disadvantages |
|---|---|---|
PPTP | popularity, high customer compatibility | low level of data protection, in comparison with other VPN protocols |
SSTP | the capability of VPN-server operation using the private IP-address for Internet access | the built-in Windows-only client, low data transfer rate when working through the cloud |
OpenConnect | the capability of VPN-server operation using the private IP-address for Internet access | is not a part of the modern OS |
L2TP over IPSec | security, stability, high customer compatibility | not included in Android (you need to use additional free software), the standard ports are used, which allows the ISP or system administrator to block the traffic |
WireGuard | modern data security protocols, low resource intensity, high data transfer rate | is not a part of the modern OS |
IPSec | reliability, very high level of data protection | the configuration is difficult for ordinary users |
IKEv2 | reliability, very high level of data protection, easy setup, supports Blackberry devices | standard ports are used, which allows the ISP or system administrator to block traffic |
OpenVPN | high level of data protection, the use of HTTPS protocol (TCP/443) | is not a part of the modern OS, very resource-intensive, low data rates |
IPSec Xauth PSK | security, it is a part of a modern mobile OS | lack of customer support for PC operating systems |
* — This feature is implemented on our cloud server as a special software extension and is available only for the users of Netcraze devices.
In most cases, for client-server remote connections, we recommend the following protocols:
L2TP over IPSec (L2TP/IPSec), PPTP, IPSec Xauth PSK, SSTP, OpenConnect
In many Netcraze models, data transfer over IPSec (including L2TP over IPSec and IKEv2) is hardware accelerated using the device processor. You don't have to worry about the privacy of IP telephony or CCTV streams in such a tunnel.
If your ISP gives you a public IP address, we recommend you to pay attention to the IKEv2, the so-called IPSec virtual server (Xauth PSK), and L2TP over the IPSec server. They are great because they provide secure access to your home network from your smartphone, tablet, or computer with minimal configuration: Android, iOS, and Windows have convenient built-in clients for these types of VPNs. For IKEv2 on Android, use the free popular strongSwan VPN client.
IKEv2 and L2TP/IPSec can be considered as the best universal option.
If your ISP only provides you with a private IP address to surf the Internet, and you can't get a public IP, you can still organize remote access to your home network using an VPN server SSTP or OpenConnect. The main advantage of the SSTP and OpenConnect tunnel is its ability to work through the cloud, i.e., it allows establishing a connection between the client and the server, even if there are private IP addresses on both sides. All other VPN servers require a public IP address. Please note that this feature is implemented on our cloud server and is available only for Netcraze users.
As for the PPTP tunnel protocol, it is the easiest and most convenient to configure, but potentially vulnerable compared to other types of VPN. However, it is better to use it than not to use a VPN at all.
And for advanced users, we may add these VPNs to the list above:
WireGuard, OpenVPN
OpenVPN is very popular but extremely resource-intensive and has no particular advantages against IPSec. Netcraze devices have such features as TCP and UDP mode, TLS authentication, certificates and encryption keys to improving VPN connection's security for OpenVPN connections.
Modern protocol WireGuard will make it easier and faster to work with VPN (several times compared to OpenVPN) without increasing the power of the hardware in the device.
For mobile devices, and organising a remote connection to the router, use:
IKEv2
IKEv2 EAP (Login/Password) client is embedded in Android, iOS, MacOS, Windows.
To consolidate networks and organize a Site-to-Site VPN, use:
IPSec, L2TP over IP (L2TP/IPSec), WireGuard
To solve specific problems of network interconnection:
EoIP, GRE, IPIP
IPSec is one of the most secure VPN protocols due to its crypto secure encryption algorithms. It is the best option for establishing Site-to-Site VPN connections to interconnect networks. It is possible for professionals and advanced users to create IPIP, GRE, EoIP tunnels both in pure form and in combination with IPSec tunnels, which will allow you to use IPSec VPN security standards to protect these tunnels. Support for IPIP, GRE, EoIP tunnels makes it possible to establish a VPN connection with hardware gateways, Linux routers, UNIX/Linux computers, and servers, as well as other network and telecommunication equipment supporting these tunnels. The tunnel setting of this type is available only in the router's command-line interface (CLI).
For more information on configuring different types of VPNs in the Netcraze devices, read the instructions:
WireGuard VPN
WireGuard — is a free, open-source software application, virtual private network protocol (VPN) to transfer encrypted data and create secure point-to-point connections.
Important
WireGuard VPN support is implemented for current generation Netcraze devices, starting from NDMS version 3.3
The features and advantages of the WireGuard protocol are in the use of modern, highly specialized data processing algorithms. The codebase of the project is written from scratch and is characterized by its compact design.
WireGuard is part of the system kernel module. WireGuard connection is software accelerated and is multithreaded, i.e., it can work stably and use resources of one kernel.
Netcraze devices can operate either as a VPN server or as a VPN client. The terms client and server are conditional due to the specifics of the protocol. But usually, the server is a device that waits for a connection, and the client is a device that initiates a connection.
When connecting to the WireGuard VPN server on Netcraze as a VPN client, you can use a computer (based on Windows, Linux, macOS), a mobile device (based on Android and iOS), or the Netcraze devices.
Using the WireGuard VPN client on Netcraze, you can connect to a VPN provider that provides a WireGuard VPN connection service or another Netcraze that operates as a VPN server and get remote access to its local network.
Important
If you plan to configure your Netcraze device as a VPN server, you should first check that it has a public IP address and, if you use the CrazeDNS service, that it works in the direct access mode. If you do not comply with any of these conditions, you will not be able to connect to such a server from the Internet.
To set up protected tunnels via the WireGuard protocol in Netcraze routers, you must install the WireGuard VPN system component. You can do this in the web interface on the General System Settings page in the NDMS Update and Component Options section by clicking on Component options.

Then you will find the WireGuard section on the Other connections page.
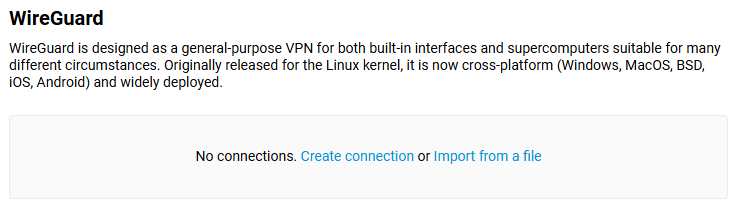
To configure the WireGuard interface manually, click the Create connection. We are not going to review the connection settings here, but you can find them in the detailed instruction:
Configuring a WireGuard VPN between two Netcraze routers (this article describes the VPN server configuration example).
You may also import WireGuard interface settings from a pre-created configuration file. Click the Import from a file and then choose the path to the pre-configured file on your computer.
The main principles of WireGuard VPN operation:
Each WireGuard tunnel is a system interface operating at the third (network) layer of the OSI model. Traffic can be routed into it, and IP access policies can be configured (network screen).
The WireGuard interface has several main configuration parameters: private and public key pair, address, and listening port.
When creating the WireGuard interface, you will need to create a pair of encryption keys — Private and Public, as well as assign the internal IP address of the device in the VPN tunnel and determine the listening port number on the VPN server side.
Private and Public keys are used to secure the connection. These keys are used to authenticate the members. Public and private keys are a pair of keys that are created (generated) simultaneously. Cryptographic algorithms involve the joint use of such a key pair. Both keys must '
match' the encrypted part of the information. For example, if encryption is done with the private key, the decryption can be done only with the public key.You need to generate encryption keys on both sides of the VPN tunnel. You will only need to exchange public keys on both sides of the VPN tunnel during the connection setup.
As for the internal address of the tunnel interface, it must be any suitable address from the private range, but it must not match the other subnets on the Netcraze router itself. This IP address is specified in the IP/bitmask format (e.g.,
10.11.12.1/24). Different addresses must be set on the VPN client and VPN server, but they should be from the same subnet. For example,172.16.82.1/24on the server and172.16.82.2/24on the client.You will need to specify the listening port number on the VPN server side, and it will be used for incoming connections to the WireGuard interface. You can set the random port number (for example,
16632); the most important thing is that it should not be blocked by your ISP and should not match the already opened ports of other services on the router.Then, you need to add peer(s). A peer is a member or client of a specific connection. You can create multiple peers in one VPN connection, for example, to connect to a VPN server from various computers or mobile devices.
Each peer is uniquely characterized by the public key of the remote side. You will need to specify a public key to the device, the internal IP address of the tunnel, and the allowed subnets in the peer settings on the other side of the VPN tunnel.
The list of allowed subnets (Allowed IPs) is a special parameter in the peer settings. These are address areas from which this peer can receive traffic (source IP addresses) and to which traffic can be sent (destination IP addresses). Technically, these addresses are used to encrypt and decrypt traffic. This technology is called Crypto Routing and is a fundamental feature of WireGuard. You must add a
0.0.0.0/0subnet to allow the transmission to any address.It is essential to specify the public IP address or the domain name of the WireGuard VPN server on the VPN client side and specify the listening port to which the VPN client will connect (for example,
myrouter01.keenetic.pro:16632). On VPN clients, this field is usually called Remote Endpoint.It is also necessary to specify the interval of attempts to check the peer activity in its settings. It is an internal check of the accessibility of the remote side of the connection by sending keepalive packets in the tunnel. By default, the value of Persistent keepalive in Netcraze peer settings is
30 seconds, but usually,10 or 15seconds between checks are enough.Important
It is recommended to leave the Persistent keepalive field empty (blank) on the server side if you are setting up a server for clients to connect to. This will prevent unnecessary standby in the wait of handshake attempt to finish when a client has disconnected.
On the client side, the Persistent keepalive field should be filled with chosen value for WireGuard VPN to work properly!
WireGuard has an encryption key routing concept that uses private key bindings to each network interface. The VPN connection is initialized by sharing public keys and is similar to the SSH model.
The encryption keys are assigned to a list of VPN IP addresses allowed in the tunnel. Access to the list of IP addresses is allowed on the network interface. When the server accepts and decrypts an authenticated packet, its source field is checked. If it matches the one specified in the Allowed IPs field of the authenticated peer, the WireGuard interface will accept the packet. When you send an outgoing packet, the destination IP address is checked to determine its legitimacy, and the appropriate peer is selected on its basis. Then the package is signed with its key, encrypted with the peer key, and sent to the public address and peer port (to Remote Endpoint). All IP packets received on the WireGuard interface are encapsulated in the UDP and are safely delivered to other peers.
WireGuard protects user data with advanced cryptography types: Curve25519 for key exchange, ChaCha20 for encryption, Poly1305 for data authentication, SipHash for hash keys, and BLAKE2 for hashing.
The Crypto Routing process allows you to provide a user with up to
100%trusted traffic and ensures high security and performance at the exit of the interface.
Examples of WireGuard connection settings
You can find detailed instructions on how to configure the Netcraze as a VPN server and VPN client to interconnect two local networks:
To set up a connection to VPN providers that can work with WireGuard, refer to the instructions:
You can use mobile devices based on Android and iOS to connect to the Netcraze router via WireGuard protocol:
Or you may use computers based on Windows, Linux, macOS:
Sometimes you want clients connected to the Netcraze router via WireGuard to access the Internet through this VPN tunnel. You will need to make additional configurations. Please refer to the article:
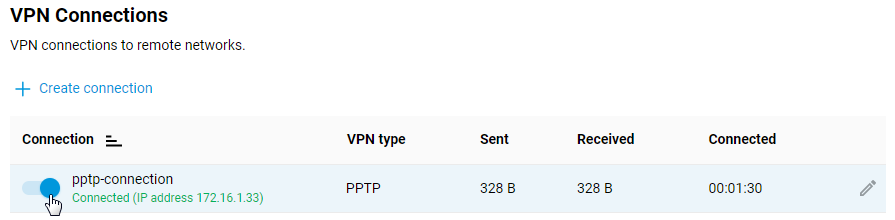
PPTP/L2TP client
You can use PPTP (Point-to-Point Tunneling Protocol) to connect to a public VPN service, office network, or another Netcraze router. PPTP may also be used to establish a secure tunnel between two local networks. The advantage of the PPTP tunnel is its ease of configuration and availability. PPTP provides secure data transfer over the Internet from smartphones, tablets, or computers. MPPE protocol can be used to protect PPTP traffic data.
In Netcraze, besides PPTP, you can also set up an L2TP (Layer 2 Tunneling Protocol) connection. Unlike other VPN protocols, L2TP does not use data encryption.
Further on, we will consider an example of a PPTP connection. Configuring an L2TP connection is done in the same way.
To set up a PPTP connection, go to the 'Other connections' page and click 'Create connection' in the 'VPN connections' section. In the 'VPN Connection Settings' window, select 'PPTP' in the 'Type (protocol)' field.
Then enter the name of the connection in the 'Connection name' field, and in the 'Server address' field, enter the domain name or IP address of the PPTP server. In the 'Username' and 'Password' fields, specify the account's data that is allowed to access the local network via PPTP.
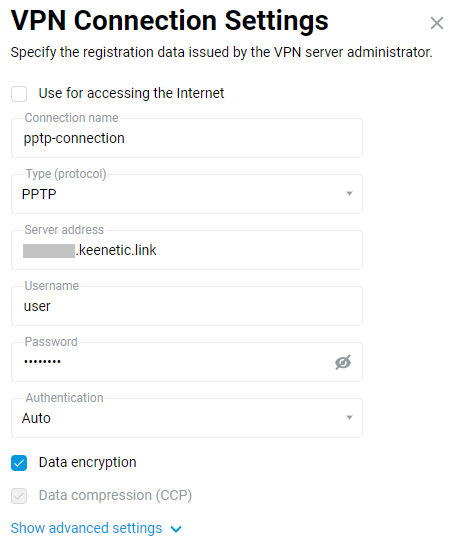
Click 'Show advanced settings' to configure the IP settings, work schedule, or the interface through which the connection should work.
Once the connection is established, put the switch in the 'On' state.
The same page will also show the status of the connection.
To test the connection, access a resource on the remote network or ping the host on the remote network (server local network) from the client computer.
PPTP server configuration in Netcraze is described in detail in the article 'PPTP VPN server'.
Tip
If you want to use this connection to access the Internet, give it the highest priority. You will find information about the priorities in the article 'Connection priorities'.
L2TP/IPsec client
You can access remote network resources by connecting to a VPN server from your Netcraze router via the L2TP over IPSec (L2TP/IPSec) protocol.
You don't have to worry about the confidentiality of file server data, IP telephony, or video surveillance streams in such a tunnel. L2TP/IPSec provides absolutely secure access to the home network from a computer with minimal configuration: Windows have a convenient built-in client for this type of VPN. Also, many Netcraze models offer hardware acceleration of data transfer over L2TP over IPsec.
To configure the L2TP/IPsec connection, you must install the 'IKEv1/IPsec and IKEv2/IPsec VPN servers, L2TP/IPsec VPN client, Site-to-site IPsec VPN' system component. You can do this on the 'General System Settings' page in the 'Updates and component options' section by clicking 'Component options'.

To set up an L2TP/IPsec connection, go to the 'Other Connections' page and click 'Create connection' in the 'VPN Connections' section. In the 'VPN Connection Settings' window, select 'L2TP/IPsec' in the 'Type (protocol)' field.
Then enter the name of the connection in the 'Connection name' field, and in the 'Server Address' field, enter the server's domain name or IP address. In the 'Username' and 'Password' fields, specify the account's data that is allowed to access the local network via L2TP/IPsec. In the 'Secret key' field specify the previously agreed key, which is installed on the server.
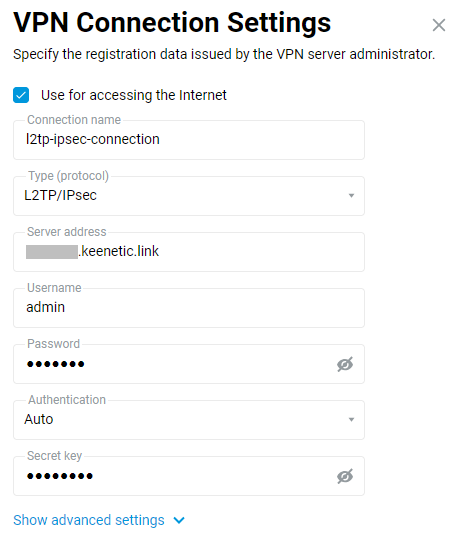
Click 'Show advanced settings' to configure the IP settings, work schedule, or the interface through which the connection should work.
Once the connection is established, put the switch in the 'On' state.
The same page will also show the status of the connection.
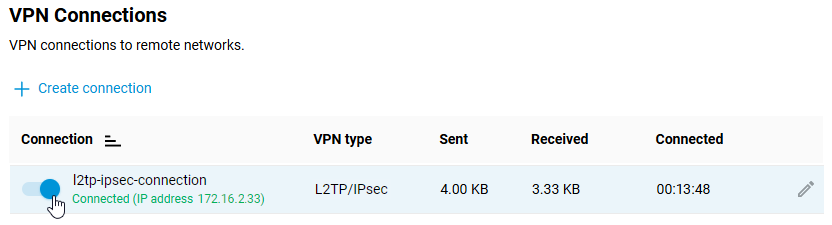
To test the connection, access a resource on the remote network or ping the host on the remote network (server local network) from the client computer.
L2TP/IPsec server configuration in Netcraze is described in detail in the article 'L2TP/IPsec VPN server'.
Tip
If you want to use this connection to access the Internet, give it the highest priority. You will find information about the priorities in the article 'Connection priorities'.
OpenVPN client and server
OpenVPN is one of the most popular protocols for VPN connection. It can be used to create a virtual private network or to interconnect local networks. OpenVPN is open source and distributed free of charge under the GNU GPL license. It provides faster connection speeds than other VPN protocols. In addition, OpenVPN can be called one of the safest protocols. All transmitted data is securely protected by the OpenSSL encryption library and SSLv3/TLSv1 protocols, which provides high security and anonymity.
Netcraze router features TCP and UDP mode for OpenVPN connection, TLS authentication, use of certificates and encryption keys to increase the security of VPN connection.
Important
Netcraze router that will host the OpenVPN server must be connected to the Internet with a public IP address, and when using the CrazeDNS domain name, it must be configured in Direct access mode. If any of these conditions are not met, it will not be possible to connect to such a server from the Internet.
Installing the system component OpenVPN client and server is necessary to configure the OpenVPN connection. With this component, you can use both client and OpenVPN server in your Netcraze. You can install the system component on the General System Settings page in the NDMS Update and Component Options section by clicking Component options.

The OpenVPN mode (client or server) is mainly defined by its configuration file.
Important
OpenVPN configuration requirements for use in Netcraze:
The configuration must be in a single file.
Certificates, keys, etc., should be included in this file.
In the configuration, you should use only the options listed in the document: OpenVPN 2.4 ManPage.
Some of the options described above may not be supported. For example, our OpenVPN implementation does not support options related to IPv6.
The order of the options and the certificates and keys enabled do not matter.
OpenSSL keys must be set without a password because router interface does not have an option to enter it.
The OpenVPN configuration file is not saved in the
startup-configconfiguration file. To get a backup of the OpenVPN client interface settings, you must save it separately.
For KN-1110, 1210, 1310, 1410, 1510, 1610, 1710, 1810 and 1910 models the number of client connections is limited by the allocated service memory partition size of 24 Kbytes for storing VPN configurations. This is especially important for OpenVPN connections because the total size of their configurations must not exceed 24 Kbytes. For modern Keenetic models with KN-XXXX index the size of the storage, where the startup-config configuration file and environment variables (including keys) are placed in compressed form, has been increased and ranges from 260 Kbytes to 2 Mbytes (depending on the model).
Let's consider an example of connecting OpenVPN of the 'site-to-site' type.
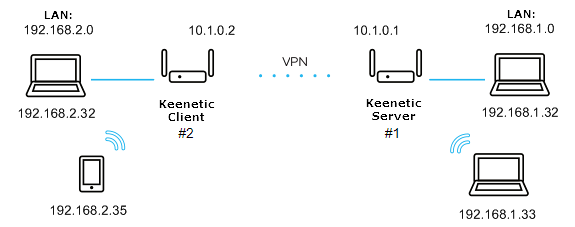
We will connect the Netcraze#2 client (Home-segment 192.168.2.0/24, tunnel address: 10.1.0.2) to the server on Netcraze#1 (Home-segment 192.168.1.0/24, tunnel address: 10.1.0.1)
First, let's look at the simplest configuration using a shared secret key.
The minimum configuration of the OpenVPN server for Netcraze#1:
dev tun
ifconfig 10.1.0.1 10.1.0.2
cipher AES-128-CBC
<secret>
  <--insert the secret key here
</secret>
verb 3
route 192.168.2.0 255.255.255.0
The minimum configuration of the OpenVPN client for Netcraze#2:
dev tun
remote KEENETIC-1.mykeenetic.net <-- server's domain name or IP address
ifconfig 10.1.0.2 10.1.0.1
cipher AES-128-CBC
<secret>
  <--insert the secret key here
</secret>
verb 3
route 192.168.1.0 255.255.255.0
or
redirect-gateway def1
or
route 0.0.0.0 0.0.0.0 <-- if it's neccessary to route all the traffic in the tunnel
Generate a shared secret key. To do this, download and install OpenVPN from here: openvpn.net/downloads.html
In this example, we will be using version
2.4.6-I602for Windows.After installing the software, restart the computer.
By default, the program will be installed in the
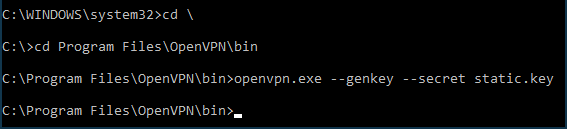
C:\Program folder.Run the Windows command line as an administrator. Go to
C:\Program Files\OpenVPN\binand run the command:openvpn.exe --genkey --secret static.key
Open the generated
static.keyfile with the shared secret key in any text editor (e.g. Notepad), copy its contents to the clipboard (Ctrl-A,Ctrl-C) and paste (Ctrl-V) into the appropriate locations of the client and server configuration files.Examples of
static-server.ovpnconfiguration files for Netcraze#1 andstatic-client.ovpnconfiguration files for Netcraze#2 with shared secret key are attached at the end of this article. There are other commented out (starting with ';') OpenVPN settings in these files which may be used later if necessary. You can use these configuration files for verification by replacing the domain nameKEENETIC-1.mykeenetic.ruinstatic-client.ovpnwith the domain name of your Netcraze#1 or its public IP address and a shared secret key to the one you generated in both files.Go to the Other connections page in the web interface of the Netcraze#1 and click Create connection in the VPN connections section. In the VPN Connection Settings window, select OpenVPN in the Type (protocol) field.
Then enter the name of the connection in the Connection name field and insert the contents of the
static-server.ovpnconfiguration file in the OpenVPN configuration field. Save the settings.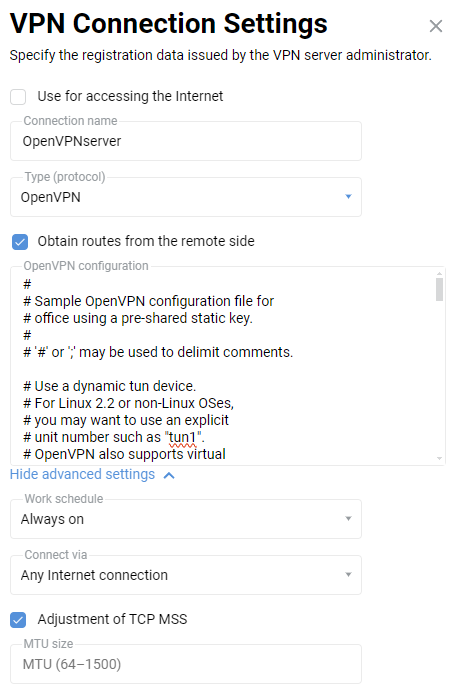
Important
From NDMS
3.4.1the server only works when Connect via — Any Internet connection is specified.In the same way, add an OpenVPN connection to the web interface of the Netcraze#2, but with a
static-client.ovpnconfiguration: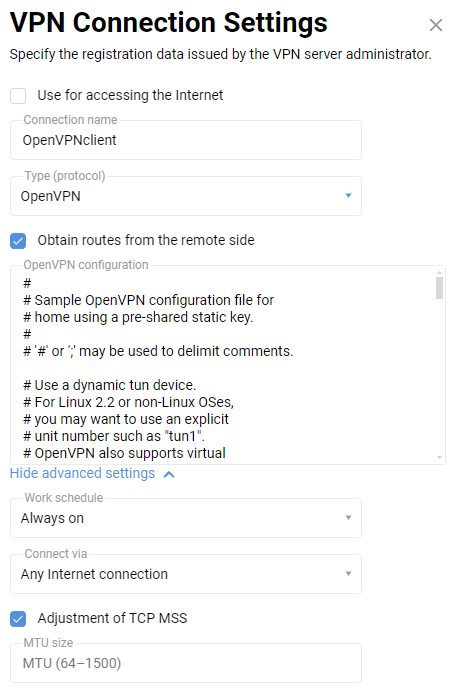
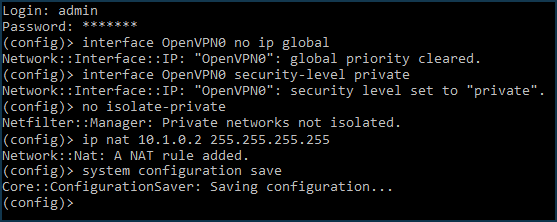
Additionally, on the Netcraze#1 (server) side, the following commands will need to be executed via the command-line interface (CLI) of the router:
interface OpenVPN0 no ip global
interface OpenVPN0 security-level private
To allow traffic between the
HomeandOpenVPN0interfaces, which have a private security level, run the command:no isolate-private
If you plan to use this server to connect the client to the Internet as well, run the command:
ip nat 10.1.0.2 255.255.255.255
and save the settings with the command:
system configuration save
Finally, it is necessary to open a port for OpenVPN connection. The default port is
UDP/1194. To do this, create a rule for the ISP interface or for the interface used to access the Internet on the Firewall page (in addition to the ISP, it can be PPPoE, L2TP or PPTP interfaces).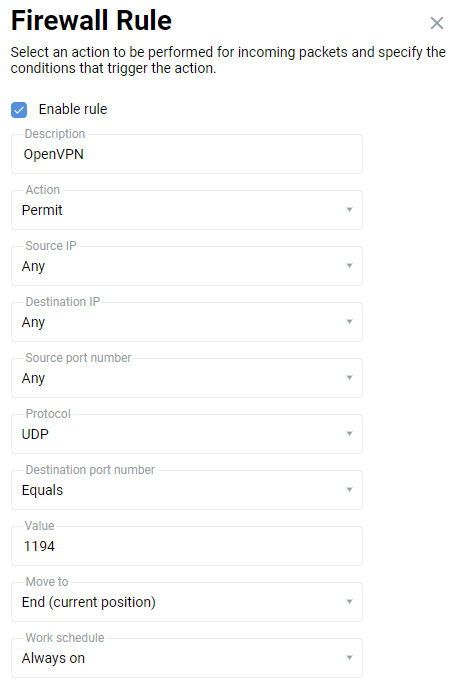
On the Firewall rule window, select Allow in the Action field, UDP in the Protocol field, and Equals
1194in the Destination port number field.After creating the connection, set the switch to Enabled.
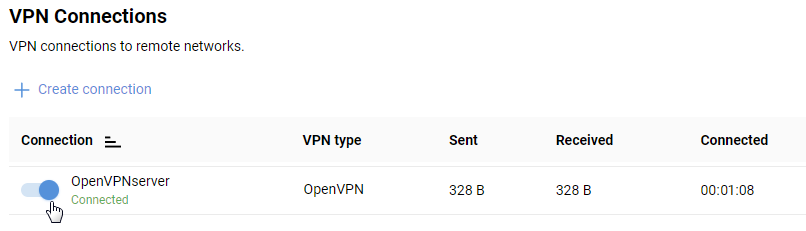
This completes the configuration of the OpenVPN tunnel. On the Other Connections page will displays the connection status and statistics.
Try pinging both ends of the tunnel to check:
ping 10.1.0.1
ping 10.1.0.2
and then remote subnets:
ping 192.168.1.1
ping 192.168.2.1
Note
The configuration of the OpenVPN interface is not saved in the startup-config file. For backup purposes, we recommend backing up the OpenVPN settings in a separate file.
If the client connection OpenVPN needs to be used to access the Internet, assign this connection the highest priority. You will find information about priorities in the article Connection policies.
In some cases in the OpenVPN configuration it is necessary to specify login and password for authentication when connecting a VPN tunnel. To do this, a special
auth-user-passsection must be added to the configuration file, specifying the login and password values. For example:<auth-user-pass> vpnclient # login r3d23xs87 # password </auth-user-pass>
An example of creating keys and certificates on Windows to connect to an OpenVPN server is shown in the article OpenVPN configuration using two-way TLS authentication.
Typical errors and solutions:
auth-user-pass without inline credentials data is not supportedThe configuration file contains a line for online login/password entry, which Netcraze does not support. Error in the Netcraze log file:
OpenVPN0 auth-user-pass without inline credentials data is not supported
OpenVPN0 Exiting due to fatal error
Delete or comment out all lines of this kind:
auth-user-passBlock-outside-dnsoption errorThe
block-outside-dnsoption is configured on the OpenVPN server, which is correctly handled only in Windows. Error in the Netcraze log file:OpenVPN0 Unrecognized option or missing or extra parameter(s) in configuration: (line X): block-outside-dns (2.4.4) OpenVPN0 Exiting due to fatal error
Add a line to the OpenVPN client configuration file:
pull-filter ignore "block-outside-dns"Error when connecting to PrivateTunnel servers
An error is displayed when trying to connect:
OpenVPN0 Unrecognized option or missing or extra parameter(s) in configuration: (line 3): client-ip (2.4.4)
Add a line to the OpenVPN client configuration file:
ignore-unknown-option client-ip block-ipv6An error occurs when using the askpass
/storage/key.txtoption:Error: private key password verification failed
This is a limitation of the current OpenVPN implementation in Netcraze. You can only use a key without a password or with a fixed password: '
password'.After updating the router to NDMS
3.9.1, the VPN tunnel to the OpenVPN servers for certain VPN suppliers may no longer be established. You can see the following messages in the system log:W [Dec 15 16:52:58] OpenVPN6: DEPRECATED OPTION: --cipher set to 'AES-128-CBC' but missing in --data-ciphers (AES-256-GCM:AES-128-GCM:CHACHA20-POLY1305). OpenVPN ignores --cipher for cipher negotiations. Error: private key password verification failed
The problem is the outdated encryption format BF-CBC, which is not supported starting from the OpenVPN
2.5.0client version ( NDMS3.9uses the OpenVPN2.6.0client version).Note
The
BF-CBCchipher is no longer supported in the default configuration. The OpenVPN2.5.0version supportsAES-256-GCMandAES-128-GCMciphers by default. You can change this behaviour using thedata-ciphersoption, for example, by specifying in the settingsdata-ciphers AES-256-GCM:AES-128-GCM:BF-CBC. To support very old OpenVPN nodes that do not support cipher negotiation (mode "--cipher"), you can specifydata-ciphers-fallback BF-CBC.When upgrading to a new version of OpenVPN, the setting "
cipher BF-CBC" in older configuration files will be converted with appendingBF-CBCto thedata-ciphersset. In addition, thedata-ciphers-fallbackmode is turned on.To successfully install the tunnel, you will need to change the directive:
cipher AES-128-CBCtodata-ciphers AES-128-CBCordata-ciphers AES-256-GCM:AES-128-GCM:CHACHA20-POLY1305If it doesn't work, then change the directive:
cipher AES-128-CBCtodata-ciphers-fallback AES-128-CBCFor maximum cipher negotiation compatibility with the remote server, specify the following directives:
data-ciphers AES-256-GCM:AES-128-GCM:CHACHA20-POLY1305data-ciphers-fallback AES-128-CBCor
data-ciphers AES-256-GCM:AES-128-GCM:CHACHA20-POLY1305data-ciphers-fallback AES-256-CBCImportant
Encryption depends on the remote OpenVPN server. Before changing the directive
cipher, please look at the system log.If the following key size error is recorded in the log:
[E] Dec 16 19:01:38 OpenVPN0: Unrecognized option or missing or extra parameter(s) in configuration: (line 22): keysize (2.6_git)
[E] Dec 16 19:01:38 OpenVPN0: Exiting due to fatal error
[E] Dec 16 19:01:38 ndm: Service: "OpenVPN0": unexpectedly stopped.Error: private key password verification failed
Then in the tunnel configuration, you need to remove the
keysize 256option directive, which is outdated for the updated client OpenVPN2.6.0, and check the tunnel connection again.You can find detailed information for the "
keysize" option by this link.
We recommend that you read the following information:
SSTP client
SSTP (Secure Socket Tunnel Protocol) tunnels can be used to connect to the Netcraze router's local network remotely.
Important
The main advantage of the SSTP VPN tunnel on a Netcraze router is its ability to work through the cloud, which allows you to establish a connection between a client and a server, even on private IP addresses.
Data transfer via the Internet in the SSTP tunnel is carried out with the help of HTTPS protocol (the data is transferred over the SSL or TLS cryptographic protocols), which provides a high level of security.
To configure the SSTP connection, it is necessary to install the 'SSTP VPN client' system component. You can do this on the 'General System Settings' page in the 'NDMS Update and Component Options' section by clicking 'Component options'.

After that, go to the 'Other Connections' page and click 'Create connection' in the 'VPN Connections' section. Select 'SSTP' in the 'Type (protocol)' field in the 'VPN Connection Settings' window.
Then enter the name of the connection in the 'Connection name' field, and in the 'Server address' field, enter the server's domain name or IP address. In the 'Username' and 'Password' fields, specify the account allowed to access the local network via SSTP.
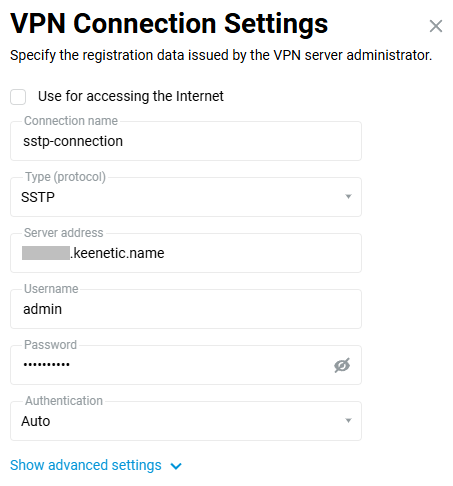
Tip
To configure the IP settings, work schedule or the interface through which the connection should work, click 'Show advanced settings'.
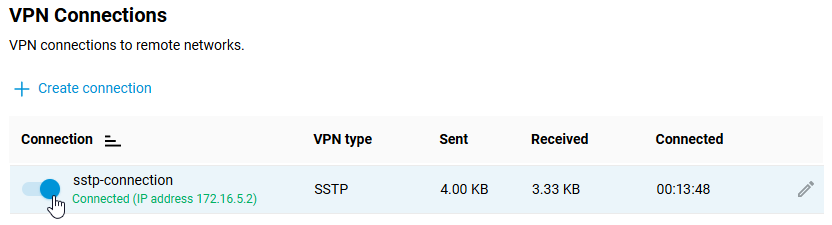
Once the connection is established, put the switch in the 'On' state.
The same page will also show the connection status.
To test the connection, access a resource on the remote network or ping the host on the remote network (server local network) from the client computer.
SSTP server configuration in Netcraze is described in detail in the article 'SSTP VPN server'.
Tip
If you want to use this connection to access the Internet, give it the highest priority. You will find information about the priorities in the article 'Connection priorities'.
IKEv1/IKEv2 clients
Starting with NDMS 3.5, an IKEv1/IKEv2 clients has been added as a separate component that allows a router to establish client connections via IKEv1 and IKEv2 protocols.
IKEv2 (Internet Key Exchange) is a version 2 key exchange protocol included in the IPSec protocol suite. It provides high data security, speed and stability.
To set up secure IKE connections on your Netcraze router, you must install the 'IKEv1/IPsec and IKEv2/IPsec VPN clients' system component. You can do this in the web interface on the 'General System Settings' page under 'Update and component options' by clicking on 'Component options'.

Afterwards, in the 'Other Connections' page under 'VPN Connections' section, click 'Create connection' to add and set up an IKE client.
In the 'VPN Connection Settings' screen, enter the registration information provided by your VPN provider or VPN server administrator.
If you want to use this connection to access the Internet, enable the option.
Enter any name to identify the connection in the 'Connection name' field, set 'IKEv2' or 'IKEv1' in the 'Type (protocol)' field and specify the server address, user name and password. In our example, an IKEv2 VPN connection is used.
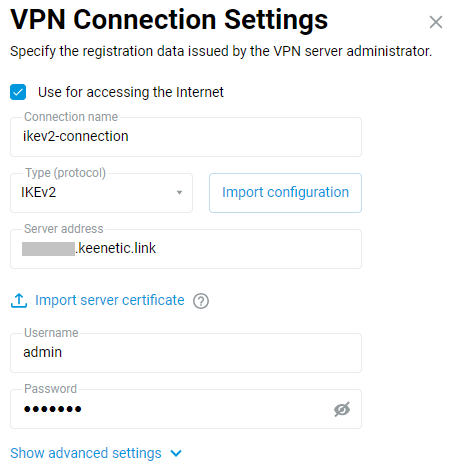
Note
The IKEv2 client uses an IKEv2 EAP (Login/Password) connection.
Once the connection has been established, toggle the switch to On.
The same page will show the status of this connection.

To set up an IKEv2 server on Netcraze, see the article 'IKEv2/IPsec VPN server'.
Tip
If the connection is used to access the Internet (e.g. you connect via a VPN provider), assign the highest priority to this connection. Drag the created VPN connection profile to the top of the list.
You will find information about the priorities in the article 'Connection priorities'.
OpenConnect VPN client
You can use OpenConnect VPN to connect remotely and securely to your Netcraze router's local network. A Netcraze router itself can act as an OpenConnect client. Starting with NDMS 4.2.1, an OpenConnect VPN server and client have been added.
Important
The main advantage of the OpenConnect VPN tunnel is its ability to work through the cloud, allowing a connection to be established between the client and the server, even with private IP addresses. Data transmission over the Internet in OpenConnect VPN is performed using the HTTPS protocol (data is transmitted using SSL or TLS cryptographic protocols), which provides a high level of security.
To set up an OpenConnect client connection, you need to install the OpenConnect VPN client system component. You can do this on the General System Settings page in the NDMS Update and Component Options section by clicking Component options.

After that, go to the Other Connections page, and in the VPN Connections section, click + Create connection. In the VPN Connection Settings window, select OpenConnect in the Type (protocol) field. Then, in the Connection name field, enter the name of the connection, and in the Server address field, enter the domain name of the server (automatically generated on the Netcraze router acting as the VPN server). In the Username and Password fields, respectively, enter the credentials of the account that allows access to the router and the local network via the OpenConnect protocol.
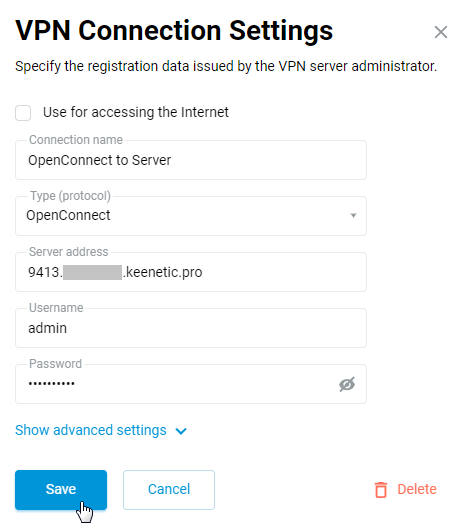
Tip
To configure IP settings, set a work schedule, or specify the interface through which the connection is made, click Show advanced settings.
After creating the connection, set the switch to Enabled.

The same page displays the connection status and statistics.
To check the connection, access any resource on the remote network (the VPN server's local network) from a computer on the client side or ping a remote network host.
To set up the OpenConnect server on a Netcraze router, see the article OpenConnect VPN server.
Tip
If you want to use this connection to access the Internet, give it the highest priority. For information on priorities, see the article Connection policies.
Connecting to a ZeroTier network
ZeroTier allows individual devices and network routers to access your LAN via a distributed interconnection overlay that automatically chooses the optimal route between nodes. The protocol's design ensures easy deployment, centralized management, stable performance, and data protection. As a result, connections are secure, providing low latency and high throughput.
To configure your Netcraze device to connect to your ZeroTier network using the command-line interface (CLI), we must first create an interface with the following CLI command.
interface ZeroTier{X} Where {X} is the index of the new interface, the number you choose.
Note
The interface command changes the context of your CLI to the indicated interface context. The subsequent commands are executed for the indicated interface until you enter the exit or other context-changing command.
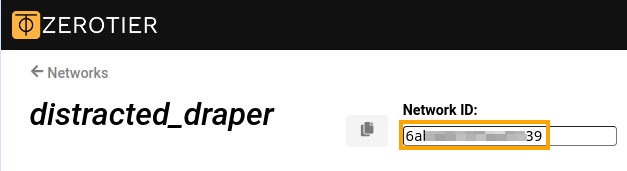
Then, let's specify the NETWORK ID of your ZeroTier network.
zerotier network-id {network_ID} Replace {network_ID} with your ZeroTier NETWORK ID without quotes or brackets. You can find your network's NETWORK ID on the ZeroTier Central management portal, as shown in the image.
Next is to enable the acceptance of addresses and routes distributed over your ZeroTier network.
zerotier accept-addresseszerotier accept-routes
Then, bring the interface up and save the configuration.
upsystem configuration save
The whole set of commands listed above should look like the following.
(config)>interface ZeroTier0Network::Interface::Repository: "ZeroTier0" interface created. (config-if)>zerotier network-id 0123456789abcdefZeroTier::Interface: "ZeroTier0": set network ID to "0123456789abcdef". (config-if)>zerotier accept-addressesZeroTier::Interface: "ZeroTier0": enabled addresses accept. (config-if)>zerotier accept-routesZeroTier::Interface: "ZeroTier0": enabled routes accept. (config-if)>upNetwork::Interface::Base: "ZeroTier0": interface is up. (config-if)>system configuration saveCore::System::StartupConfig: Saving (cli).
After entering the commands, your Netcraze node should appear on your ZeroTier Central network dashboard. To simplify network management, enter a name and description for the new node. You may also need to authorize the new member if your network's Access Control mode is Private (the default setting).
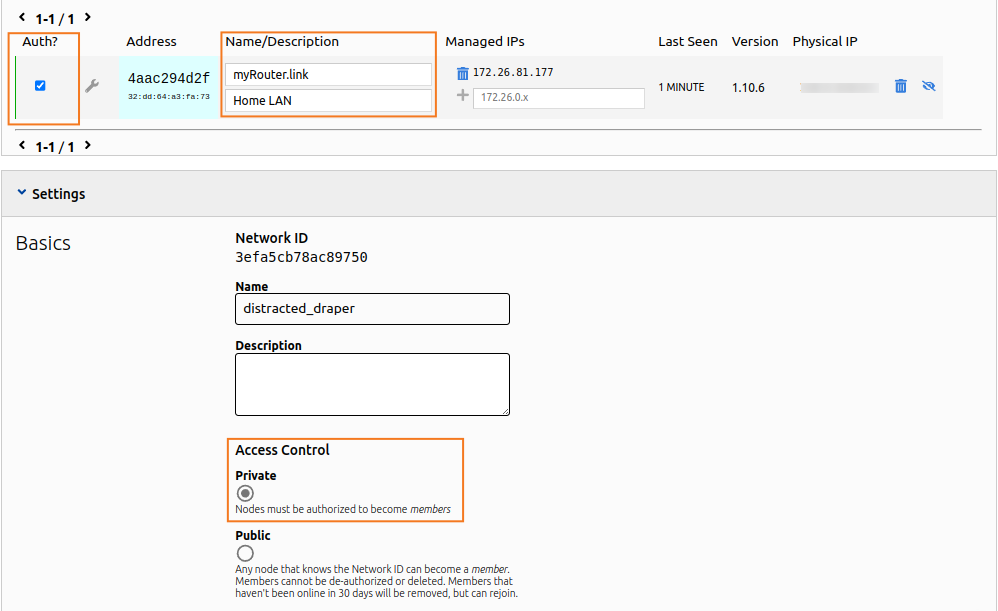
You may use the show command to review the connection state on your Netcraze device. The connected: yes line indicates that the connection status is positive.
(config)> show interface ZeroTier0
id: ZeroTier0
index: 0
interface-name: ZeroTier0
type: ZeroTier
description:
traits: Mac
traits: Ethernet
traits: Ip
traits: Ip6
traits: Supplicant
traits: EthernetIp
traits: ZeroTier
link: up
connected: yes <------
state: up
mtu: 2800
tx-queue-length: 1000
address: 172.26.81.177 <------
mask: 255.255.0.0
uptime: 312
global: no
security-level: public <------
ipv6:
addresses:
address: fe80::cc56:2aff:fed4:d8a3
prefix-length: 64
proto: KERNEL
valid-lifetime: infinite
mac: 32:dd:64:a3:fa:73
auth-type: none
zerotier:
via: GigabitEthernet1
local-id: 4aac294d2f
network-id: 0123456789abcdef
network-name:
status: OK
summary:
layer:
conf: running
link: running
ipv4: running
ipv6: disabled
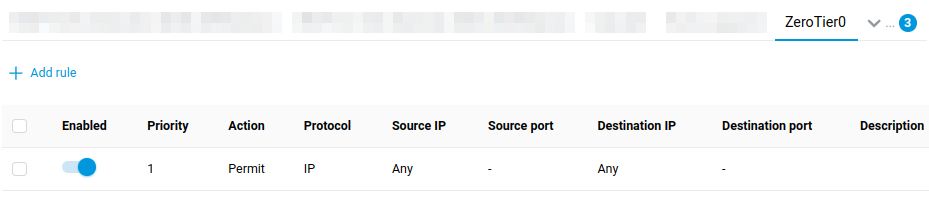
ctrl: runningNote that the created interface has a security-level: public setting. This means that incoming connections must be explicitly allowed by the Firewall. Considering your ZeroTier network is trusted, one rule allowing all incoming traffic is enough. Add a new Permit rule for the created ZeroTier interface, and select IP for Protocol and Any for Source IP and Destination IP, as shown.
Tip
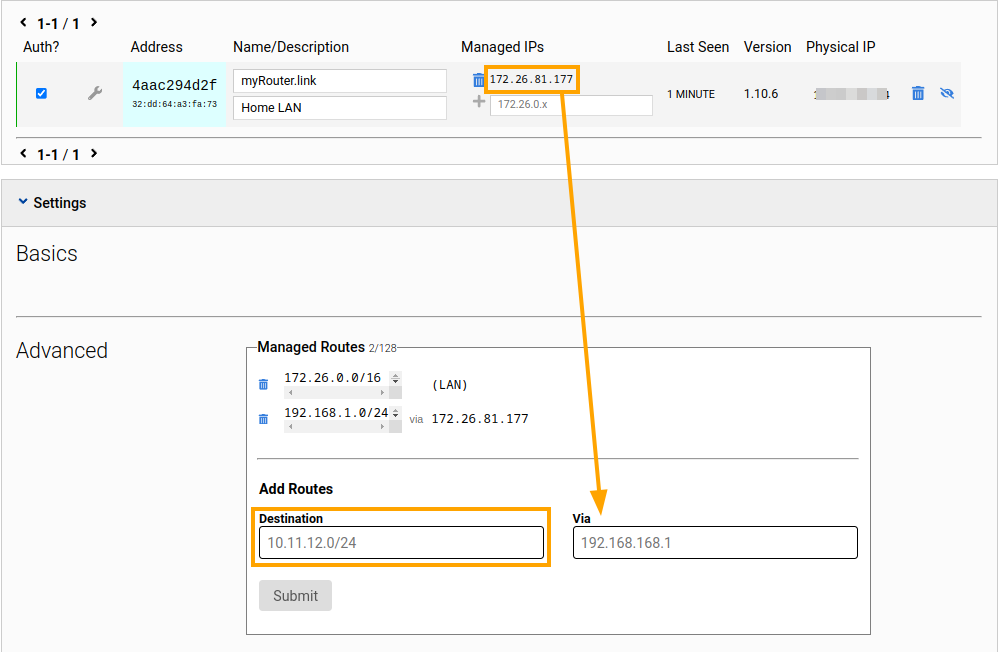
To inform other devices on your ZeroTier network about the LAN behind your new node, create a route in the Advanced section of your network's settings on ZeroTier Central. Use the Managed IPs address (the address: 172.26.81.177 line in the output above) as the Via address. Enter your router's LAN subnet address (192.168.1.0/24 by default) in the Destination field.
IPsec VPN site-to-site
Netcraze has a built-in IPsec VPN client/server. Thanks to this function, it is possible to combine several Netcraze routers into one network via an IPsec VPN tunnel following the strictest security requirements.
In most cases, IPsec VPN is used for secure connection to the office network (e.g., from the home network to corporate server) or for combining networks (e.g., two remote offices). With the IPsec VPN tunnel, you don't have to worry about file server data privacy, IP telephony or video surveillance streams. IPsec is one of the most secure VPN protocols due to crypto-resistant encryption algorithms.
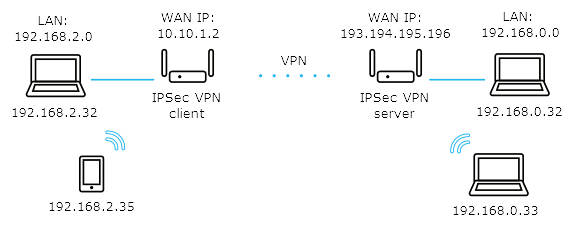
Let's take a look at an example of combining two local area networks (192.168.2.x and 192.168.0.x) over an IPsec VPN.
Important
To build an IPsec VPN tunnel over the Internet, at least one of the routers must have a public IP address (on the WAN interface). For simplicity, it is recommended to use a permanent (static) IP address on the WAN interface and use the CrazeDNS or DDNS domain name service to get a permanent name. For the IPSec tunnel to work, the CrazeDNS service must only be running in the Direct Access mode on the router, which will be waiting for a connection.
The addresses of the connected networks should belong to different subnets. It is not recommended to use the same address space in the local and remote network, leading to a conflict of IP addresses.
Two Netcraze routers will be needed for an IPsec VPN connection. This type of connection is called a 'site-to-site IPsec VPN'.
One Netcraze will act as an IPsec responder (let's call it a server), and the other Netcraze will act as the initiator of the IPsec connection (let's call it a client).
The router acting as an IPsec server has a static public IP address to connect to the Internet. The second Keenetc, which acts as an IPsec client, uses a private IP address.
So, let's move directly to configuring the routers to establish a secure IPsec VPN tunnel between them and connect the two networks.
Both routers must have an Site-to-site IPsec VPN and L2TP/IPsec VPN client system component installed on them.
You can do this by clicking Component options on the General System Settings page in the Updates and component options section.

Configuring Netcraze as a server (responder, waiting for IPsec connection).
On the Other Connections page, under Site-To-Site IPsec VPN Connections section, click Create connection.
The Site-to-site IPsec VPN Connection Setup window will open.
In our case, this Netcraze will act as a server, so enable the Wait for connection from a remote peer option (in this case, the client will be the initiator of the connection, and the server will be waiting for the connection).
The Nailed-up option is intended to keep the connection active and restore the tunnel in case of a break (this parameter can be enabled at one end of the tunnel).
The Dead peer detection option is intended for determining the operability of the tunnel.
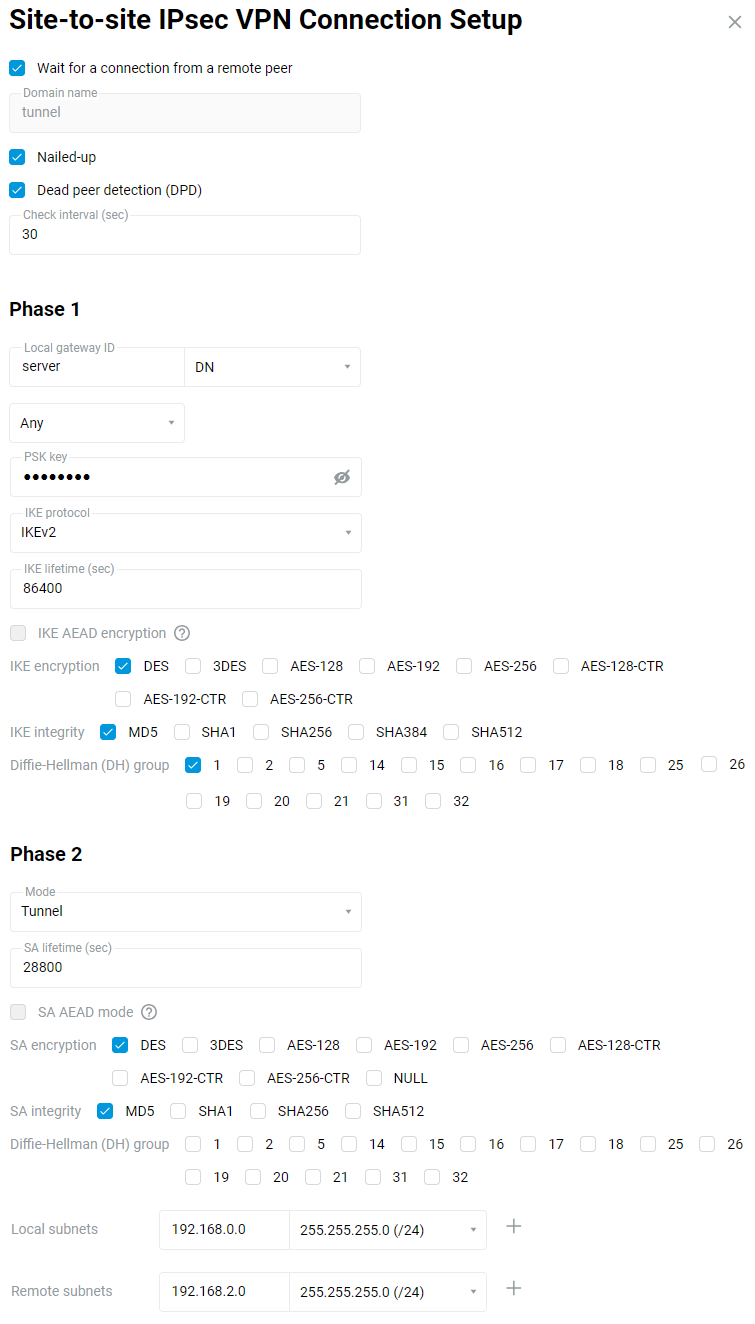
In the Phase 1 settings, Local gateway ID field you can use any identifier: IP address, FQDN (full domain name), DN (domain name), E-mail (e-mail address). In our example, we use the identifier DN (domain name) and enter a random name in the blank field of the identifier.
Important
Pay attention to the local and remote gateway identifiers in the IPsec tunnel Phase 1 settings. The
IDs must be differentandmust be crossed out. For example, by selecting DN as the identifier, set the server to DN:Local gateway ID:
serverRemote gateway ID:
client
and the client:
Local gateway ID:
clientRemote Gateway ID:
server
In the case of multiple tunnels, the settings of local and remote identifiers
must be unique for each tunnel.In the Phase 2 settings, field Local subnets, you should specify the address of the local network (in our example
192.168.0.0), and in the field Remote subnets, you should specify the address of the remote network that will be behind the IPsec tunnel (in our example192.168.2.0).Important
The Phase 1 and Phase 2 settings must be the same on both sides of the IPsec VPN tunnel. Otherwise, the tunnel will not be installed.
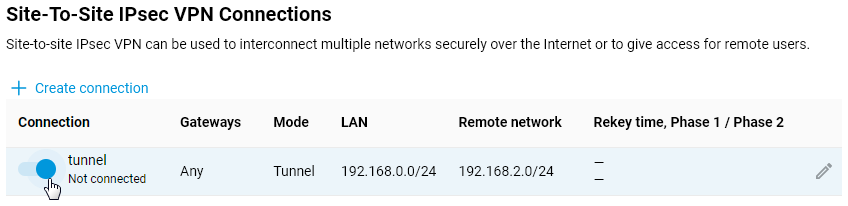
After creating the IPsec connection, set the switch to On.
Configuring Netcraze as a client (IPsec connection initiator).
On the Other Connections page, under Site-To-Site IPsec VPN Connections, click Create connection.
The Site-to-site IPsec VPN Connection Setup window opens. In our case, this Netcraze acts as a client, so enable the Autoconnect option (in this case, the client initiates the connection).
The Nailed-up option is intended to keep the connection active and restore the tunnel in case of a break (this parameter is enough to enable at one end of the tunnel).
The option Dead peer detection (DPD) is intended to determine the tunnel's operation.
In the Remote gateway field, specify the public IP address or domain name of the remote Netcraze (can be the CrazeDNS or DDNS name).
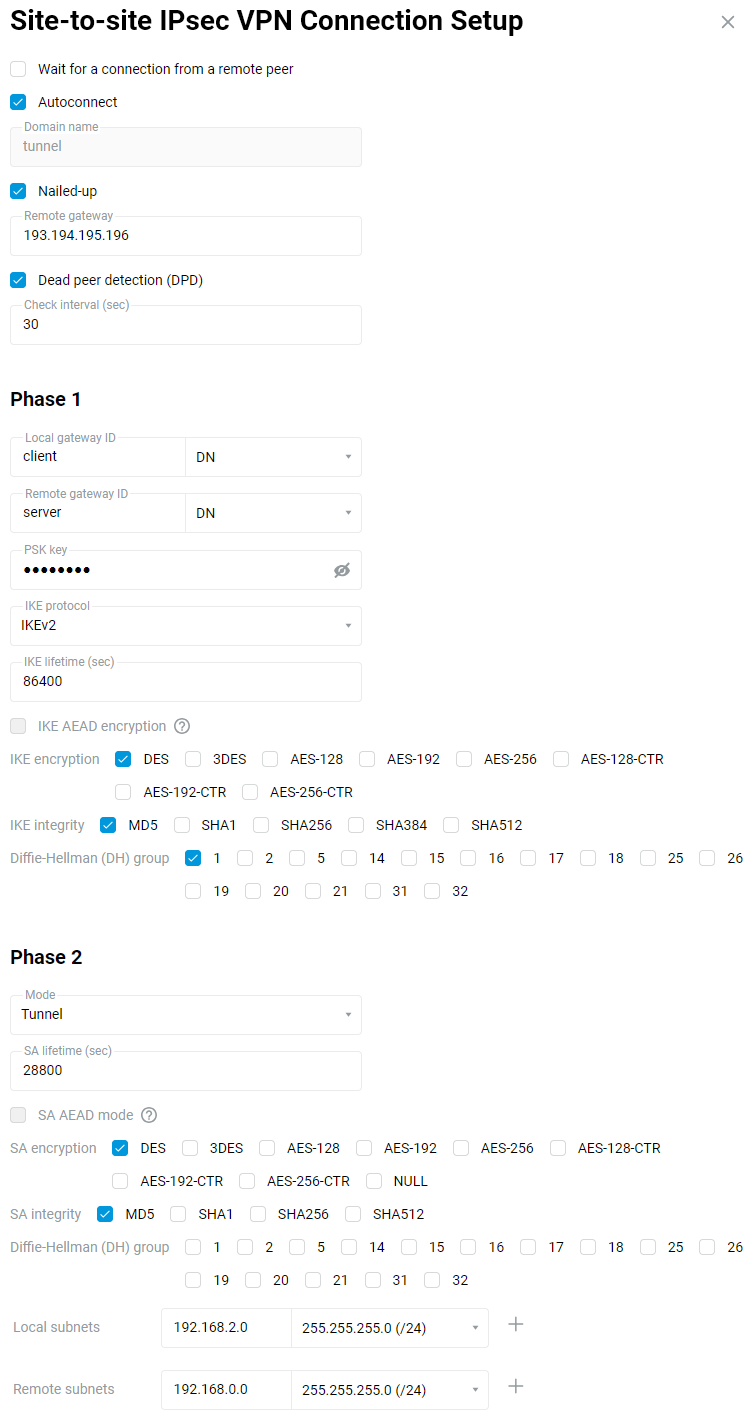
Important
In the Phase 1 settings, the Local gateway ID and Remote gateway ID fields must have the same identifiers that you used on the remote router, but they must be crossed out. For example, by selecting DN as the identifier, set it on the server:
Local gateway ID:
serverRemote gateway ID:
client
and the client:
Local gateway ID:
clientRemote Gateway ID:
server
In the case of multiple tunnels, the settings of local and remote identifiers must be unique for each tunnel.
In the Phase 2 settings, field Local subnets, you should specify the address of the local network (in our example
192.168.2.0), and in the field Remote subnets, you should specify the address of the remote network that will be behind the IPsec tunnel (in our example192.168.0.0).Important
The Phase 1 and Phase 2 settings must be the same on both sides of the IPsec VPN tunnel. Otherwise, the tunnel will not be installed.
After creating the IPsec connection, set the switch to On.
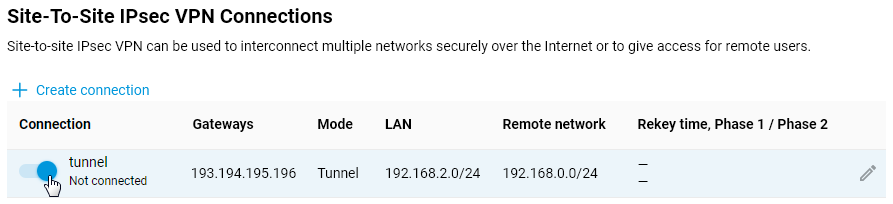
Verifying the status of the IPsec connection.
If the IPsec connection settings were set correctly on both devices, the IPsec VPN tunnel must be established between the routers.
The Site-To-Site IPsec VPN Connections section on the Other Connections page shows the connection status. If the tunnel is established, the connection status will be Connected.
Here is an example of the tunnel status on a Netcraze (as a client):
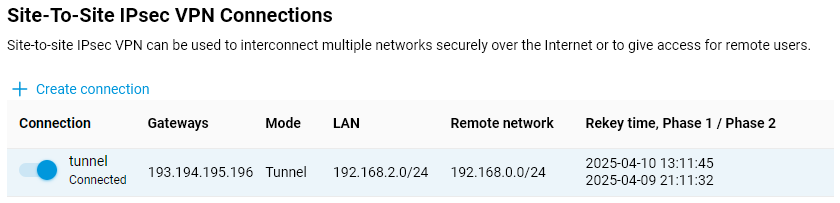
And here is an example of the tunnel status on a Netcraze (as a server):
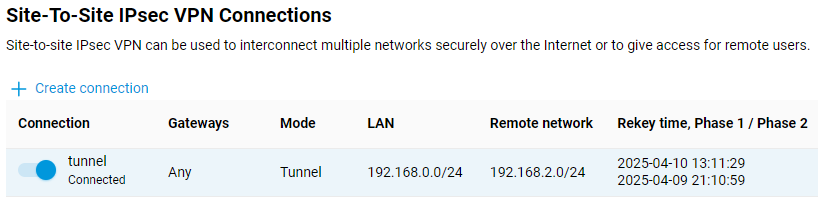
To check if the tunnel is working, ping the remote Netcraze or a computer from the remote network behind the IPsec VPN tunnel.
Tip
Broadcast packets (e.g. NetBIOS) will not pass through the VPN tunnel, so the names of the remote hosts will not be displayed in the network environment (they can be accessed via IP address, e.g.
\\192.168.2.27).If an IPsec VPN tunnel has been installed, but you are can only ping the remote Netcraze and not the hosts on the remote network, then it is most likely that the Windows Firewall or similar software is blocking ICMP traffic (
ping) on the hosts themselves.Also, each Netcraze must be the default gateway in its network, if this condition is not met, traffic will pass the tunnel. In this case you need to add a route to the remote network manually to the local hosts or via DHCP options on the router, which is the DHCP server in this scheme.
Tip
We recommend using the IKEv2 version of the protocol. Use IKEv1 only when your device does not support IKEv2.
If you are experiencing interruptions in your VPN connection, try disabling the Nailed-up' and 'Dead peer detection (DPD) options in the Netcraze router.
Setting up IPIP, GRE and EoIP tunnels
Netcraze routers have the ability to create IPIP (IP over IP), GRE (Generic Routing Encapsulation), EoIP (Ethernet over IP) tunnels both in pure form and in combination with IPSec tunnel, allowing to use IPSec VPN security standards to protect these tunnels.
The support of IPIP, GRE, EoIP tunnels in Netcraze routers allows you to establish a VPN connection with hardware gateways, Linux routers, computers and servers with UNIX/Linux OS, as well as with other network and telecommunications equipment that support these tunnels.
It is necessary to install additional corresponding components of the NDMS system to work with tunnels:
EoIP tunneling (Allows creating Ethernet over IP tunnels);
GRE tunneling (Allows creating GRE tunnels);
IP-IP tunneling (Allows creating IP-over-IP tunnels).
You can do this on the 'General Sstem Settings' page in the 'Updates and component options' section by clicking on 'Component options'.

Brief description
IPIP and GRE tunnels are network layer tunnels (L3 of the OSI model), where IP addresses of both sides are available. They are presented in the system as GreX and IPIPX interfaces, and routing (including the default route) can be configured through them just like through any other interface. Also, these interfaces can be configured with a security level of access - private, protected, or public (information on access levels can be found in the article 'Configuring firewall rules with the command-line interface)'.
IPIP (IP over IP) is one of the easiest tunnels to set up (it encapsulates only unicast IPv4 traffic). You can configure it on a UNIX/Linux system and on different routers (e.g. Cisco).
GRE (Generic Routing Encapsulation) tunnel is one of the popular VPN types. GRE tunnels are compatible with hardware security gateways, Mikrotik routers, Linux routers and other similar equipment (e.g. Cisco, Juniper, etc.).
EoIP tunnel (Ethernet over IP) is a Datalink layer tunnel (L2 of the OSI model) over the network layer (L3). Data is transmitted through this tunnel at the Ethernet frame level. EoIP provides a transparent network environment that emulates a direct Ethernet connection between networks. All MAC addresses are visible, and it is possible to connect two L2 LANs over the Internet using this type of tunnel. EoIP uses GRE as its transport. The EoIP tunnel can work over IPIP, PPTP and any other connection capable of transmitting IP packets. Any traffic other than IP can be sent through it, including ARP, DHCP, PPPoE, IPv6, etc. Subnet scanning via ARP will work in the tunnel by default when the security level changes to private/protected. In the system, it is presented as an EoIPX interface.
EoIP is developed by MikroTik, so there is compatibility with them and Linux routers that know how to work with EoIP.
Important
The IPIP, GRE, EoIP tunnels are of the point-to-point type. Both tunnel participants must have external IP addresses (or be on the same network), and there must be no NAT address translation between them. These are the prerequisites for establishing a tunnel.
In simple terms, there are no security mechanisms for these tunnels (no encryption or authentication mechanisms).
The IPIP, GRE and EoIP tunnels operate without saving the state of the connection, i.e. it is impossible to understand whether the tunnel is functional. We can only configure both sides and then check the data transfer.
You can use the Ping Check function on IPIP, GRE and EoIP tunnel interfaces to check its availability.
The IPIP, GRE and EoIP tunnels work directly over the IPv4 protocol. IPIP uses IP protocol number 4, GRE and EoIP use IP protocol number 47.
Examples
Important
At the moment, the configuration of IPIP, GRE and EoIP tunnels is implemented through the command-line interface (CLI) of the router. The full syntax of the commands listed in this article can be found in the Command Reference Guide in the Download Center.
The following examples show private IP addresses, which can only be used within the local network. There must be public IP addresses at both ends of the tunnels to create tunnels over the Internet.
For GRE the interface name will be Gre0, for IPIP the interface name will be IPIP0.
Setting up a GRE/IPIP tunnel between two Netcraze routers
Example 1. One side of the tunnel setup:
(config)>
interface IPIP0(config-if)>tunnel destination router1.example.com(config-if)>ip address 192.168.100.1 255.255.255.0(config-if)>security-level private(config-if)>up(config-if)>exit(config)>system configuration saveAt the other end of the tunnel, 'mirror' settings are set:
(config)>
interface IPIP0(config-if)>tunnel destination 8.6.5.4(config-if)>ip address 192.168.100.2 255.255.255.0(config-if)>security-level private(config-if)>up(config-if)>exit(config)>system configuration saveYou can then try to ping the address of the remote side of the tunnel from any side to check if the tunnel is working correctly.
It should be noted that as a destination, you can specify either the domain name (Cloud Mode in CrazeDNS will not work!) or the IP address of the remote side (WAN interface of the device).
Example 2. One side of the tunnel setup:
(config)>
interface IPIP0(config-if)>tunnel destination router1.example.com(config-if)>ip address 192.168.100.1 255.255.255.0(config-if)>up(config-if)>exit(config)>no isolate-private(config)>ip route 10.10.2.0 255.255.255.0 IPIP0/*static route to a remote private subnet 10.10.2.0/24 through the tunnel*/ (config)>system configuration saveAt the other side of the tunnel:
(config)>
interface IPIP0(config-if)>tunnel destination 8.6.5.4(config-if)>ip address 192.168.100.2 255.255.255.0(config-if)>up(config-if)>exit(config)>no isolate-private(config)>ip route 10.10.1.0 255.255.255.0 IPIP0/*static route to a remote private subnet 10.10.1.0/24 through the tunnel*/ (config)>system configuration save
Setting up an EoIP tunnel between two Netcraze routers
For EoIP, the interface name will be EoIP0.
In the case of the EoIP tunnel, the settings will be absolutely the same, except for two things:
you can set the interface MAC address;
EoIP tunnel ID, tunnel identifier (number in the range from
1to65535) must be set, and it must match at both ends of the tunnel.
One end of the tunnel setup:
(config)>interface EoIP0(config-if)>tunnel destination router1.example.com(config-if)>tunnel eoip id 1500(config-if)>ip address 192.168.100.1 255.255.255.0(config-if)>security-level private(config-if)>up(config-if)>exit(config)>system configuration save
The 'mirror' setting is at the other end of the tunnel:
(config)>interface EoIP0(config-if)>tunnel destination 8.6.5.4(config-if)>tunnel eoip id 1500(config-if)>ip address 192.168.100.2 255.255.255.0(config-if)>security-level private(config-if)>up(config-if)>exit(config)>system configuration save
You can then try to ping the address of the remote side of the tunnel from any side to check if the tunnel is working correctly.
The EoIPx interface can be included in the Bridge to join local networks. To do this, configure the EoIP interface without an IP address on both sides and then add it to the Bridge Home:
(config)>interface Home(config-if)>include EoIP0(config-if)>exit(config)>system configuration save
Important
For IPIP, GRE and EoIP tunnel interfaces, the MTU value is automatically calculated based on the interface through which the traffic will go, but it can be set manually through the command interface ip mtu.
When connecting local networks using the EoIP tunnel, we recommend using manually specified static IP addresses on hosts. If clients are configured to obtain IP addresses from a DHCP server automatically, problems may arise with IP address allocation after the tunnel is established because DHCP requests will go into the tunnel, i.e. the remote network.
Using IPIP, GRE and EoIP tunnels with IPSec
If a special system component IPSec VPN is installed, it is possible to protect these tunnels using IPSec safety standards, both in automatic and fully manual mode. We will not describe the manual mode because experienced users can set up an IPSec tunnel with the correct mode and then raise the tunnel over IPSec. In the case of automatic configuration, several manual mode problems are solved at once:
MTU value is set correctly;
the connection becomes connection-oriented, and you have to choose which end of the tunnel is the client and which end is the server;
automatically resolves the problem of NAT pass-through because it uses IPSec NAT Traversal (NAT-T), which turns all tunnel traffic into a UDP stream on port
500/4500;encryption and data integrity checks are used.
The IPSec VPN component appends the following settings to tunnels:
interface ipsec preshared-key <key>— PSK for encryption;interface ipsec encryption-level <level>— encryption level. By default, it is set to cover as many devices as possible and is hardware accelerated. There's no need to change.
Since IPSec separates a client from a server, to configure the client (the initiator, the side that will try to establish the connection), you must use the command interface tunnel destination, and to enable the server mode (the party that will respond to connection attempts), you must use the command interface tunnel source.
Example of EoIP tunnel configuration with IPsec (in our example, the side with the WAN address 8.6.5.4 is the server):
Server:
(config)>interface EoIP0(config-if)>tunnel source ISP(config-if)>tunnel eoip id 1500(config-if)>ipsec preshared-key mytestingkey(config-if)>ip address 192.168.100.1 255.255.255.0(config-if)>ipsec ikev2(config-if)>security-level private(config-if)>up(config-if)>exit(config)>system configuration save
Client:
(config)>interface EoIP0(config-if)>tunnel destination 8.6.5.4(config-if)>tunnel eoip id 1500(config-if)>ipsec preshared-key mytestingkey(config-if)>ip address 192.168.100.2 255.255.255.0(config-if)>ipsec ikev2(config-if)>security-level private(config-if)>up(config-if)>exit(config)>system configuration save
Important
The pre-shared IPSec PSK key must match at both ends of the tunnel.
In the interface tunnel source command, you can specify both the source interface and the IP address where the server will be waiting for the connection. However, preference is given to the interface, because in this case, all the reconfiguration when changing the address and other events will take place automatically.
Notice
Tunnels based on EoIP/IPSec and GRE/IPSec are not compatible with PPTP connections due to using the same GRE protocol. In this case, there is only one option available: IPIP/IPsec.
Important
Pay attention to the isolate-private option.
It is not allowed to establish a connection between private interfaces by default, but access can be granted if necessary. If you need to allow connections between private interfaces (i.e. do not isolate access), run the command no isolate-private.
Use the command system configuration save to save the router settings.
Proxy client
Starting with NDMS 3.9, a proxy client component has been added. This component will be useful for complex tunnelling applications, as well as for the simple task of connecting your network to the Internet via a proxy server. This functionality allows you to configure a connection via proxy servers using HTTP, HTTPS and SOCKS5.
To use a proxy connection, you must first install the appropriate Proxy client system component on your router. You can do this in the web interface on the General System Settings page in the NDMS Update and Component Options section by clicking Component options.

To configure Internet access via a proxy, go to the Other Connections page, scroll to Proxy Connections and click the Add connection button.
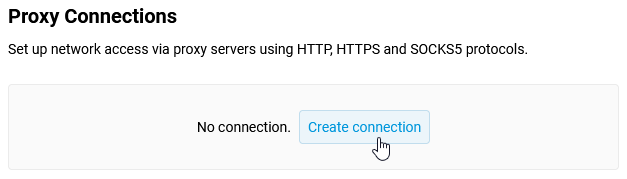
You will then be prompted to fill in certain fields. Enter the registration details provided by your proxy server administrator.
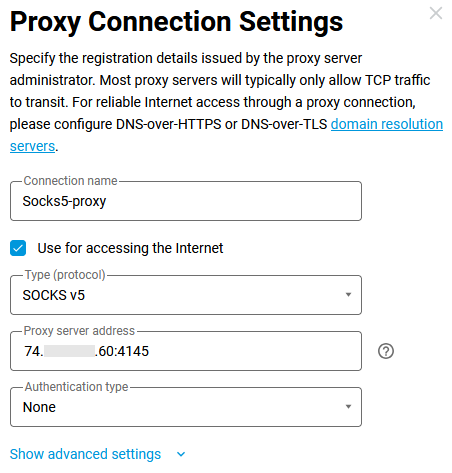
Important
Access to Internet resources via this connection may not work correctly if network devices do not use DNS query resolution via DoT/DoH protocols. For reliable Internet access via a proxy, enable DNS-over-TLS or DNS-over-HTTPS in your router's DNS settings.
After establishing the connection, set the switch to the On position.
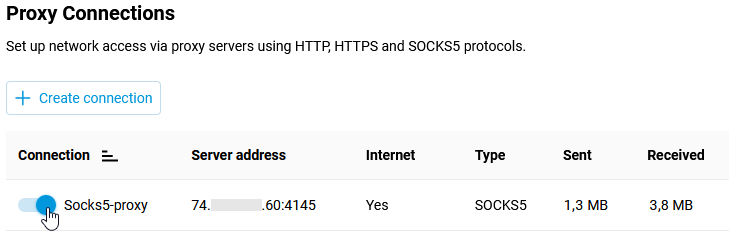
Next, in the Connection Policies menu, configure Internet access via the proxy connection you created. Drag it to the top of the list to make it the primary connection.
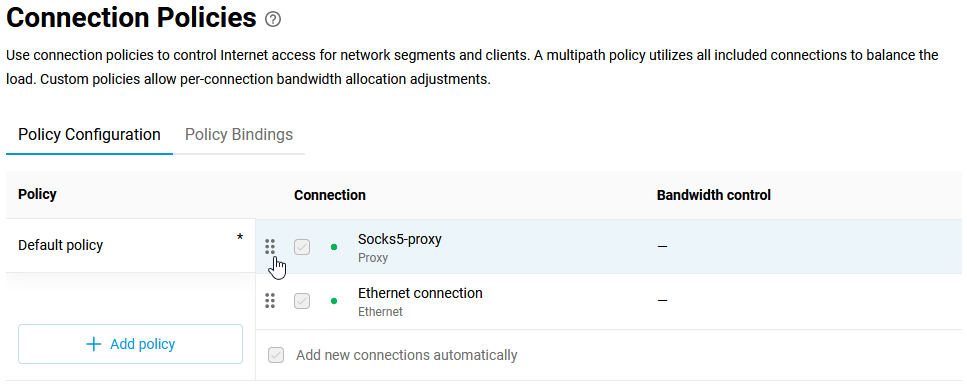
After that, all clients connected to the router will access the Internet via a proxy connection. If you need to configure access for only certain clients, you will need to create a separate profile and link specific clients to it. Instructions on how to do this are provided in the Connection policies article.
The setup is complete.
To test it, you can use any public internet service to check the IP address and the country where the IP is located.
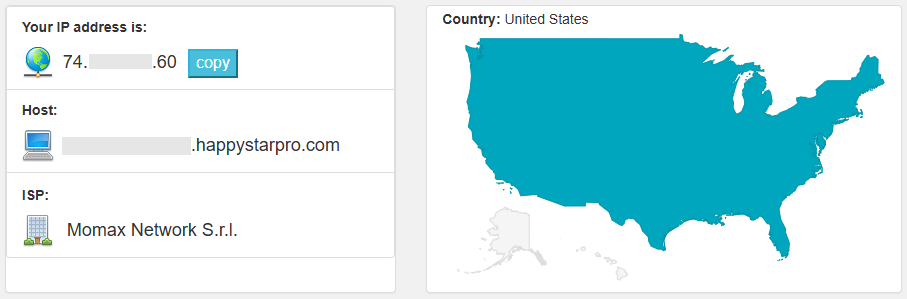
Connection policies
Connections provide access to external networks — the Internet and all others over Ethernet, 3G/4G, ADSL / VDSL, Wi-Fi, VPN. Netcraze routers support multiple simultaneous connections (usually called Multi-WAN). In such cases, priorities determine the order in which connections are used. The highest priority makes the connection the default one.
Note
When you turn on the router, the default gateway will be the Internet connection gateway with the highest priority. If your Netcraze has multiple connections and the default connection fails, the gateway will be the next priority available connection with Internet access.
You can increase or decrease the priority of any connection in the web interface by simply dragging and dropping the name in the list. In addition to the Default policy with all connections, you can create others. They may only include the specific connections you need, with their priority setting, and be bound to specific home devices and network segments. In other words, this feature is called Policy-Based Routing (PBR).
By default, all unregistered devices in the basic Home and Guest segments are bound to the default policy. You can also create your own segments, such as your children's devices or smart home appliances. Any network client can be registered, and then it can be individually bound to the desired connection policy. Binding is also done by dragging the device or segment onto the policy.
Home users can appreciate PBR when solving the following actual problem: letting specific devices in the network go through a VPN connection and the rest — through the main ISP. Also, it opens up the possibility of load balancing when using 3G/4G modems with traffic limitations.
Configuration of priorities and policies can be found in the web interface on the Connection Policies page.
Let's take an example of a Netcraze router that uses multiple connections to the Internet. An ISP provides a default connection over a leased line, and in addition, the router establishes an IKEv2 VPN connection, through which the Internet is also available. You need to configure all home clients to connect to the Internet via the primary connection, and a single device (host named PS4pro) will use the VPN connection to connect to an external network.
A separate Internet connection policy must be configured. On the Connection Policies page, on the Policy Configuration tab, click + Add policy and enter the name of the new policy. Here, a policy is a set of routing rules that apply to traffic from hosts when they access the Internet.
Note
A maximum of
16policies can be created in NDMS.In our example, the added policy (
GamePal) is intended to provide access only through an IKEv2-VPN connection.On the right side of the Connection column, you only need to check this connection and save the settings.
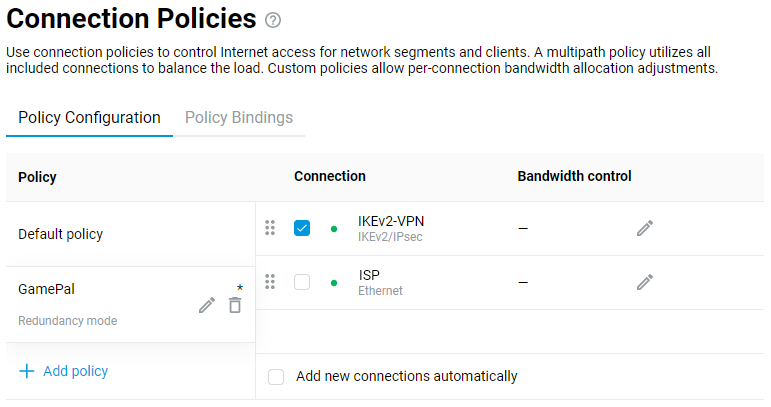
Also, on the Connection Policies page, click the Policy Bindings tab. The Show all objects option allows you to display all the clients registered in the local segments of your Netcraze router, as well as the local network segments themselves.
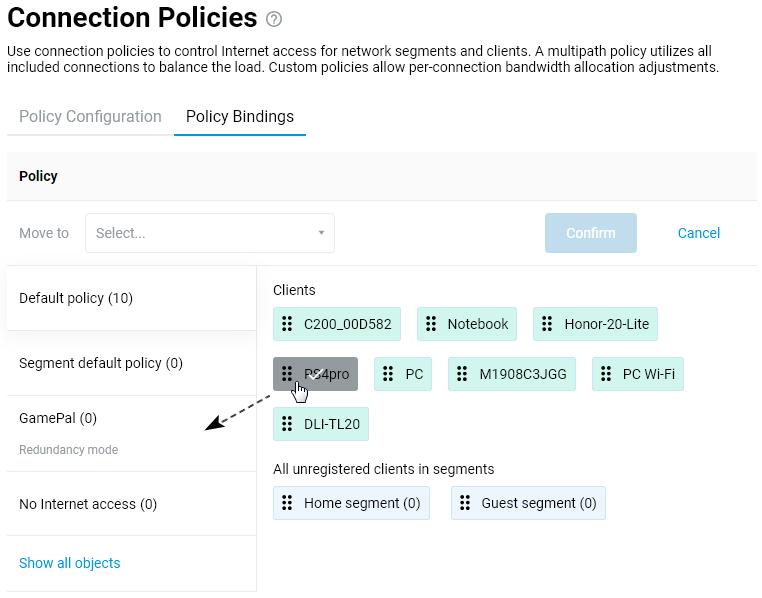
You can select multiple objects with the mouse. In our example, we need only one object, the
PS4proclient, to be dragged and dropped onto the previously createdGamePalpolicy.
This completes the configuration. Make sure that the IKEv2-VPN connection used in the policy is enabled and configured to access the Internet (the Use for accessing the Internet option is enabled). This can be done on the Other Connections page.
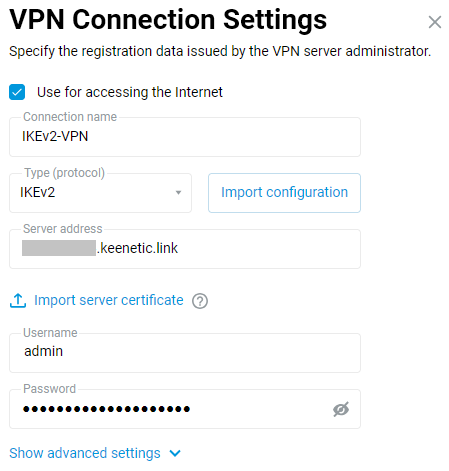
Now that the
PS4prodevice needs to connect to the Internet, the router will send its request over an IKEv2-VPN connection. All other devices on the router's LAN will be connected to the Internet via the primary connection.If necessary, you can check or change the connection policy of each client on your Netcraze device's network on the Client Lists page.
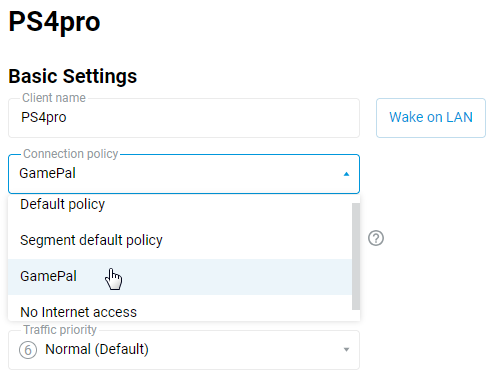
Note
Only DNS servers obtained from connections in the policy are added to this policy. The same applies to any additional DNS server that was added manually for a specified interface. If a custom DNS server is added without specifying an interface (the Connection field is set to Any), it is used by all policies.
By default, a Netcraze router prohibits using DNS servers received on an interface not included in a policy. If the same DNS address is received on different interfaces, it can be used only for the main connection.
With the Connection Policies mechanism, it is also possible Using multiple WAN connections in load balancing mode (configuring from the CLI).
Tip
In NDMS, you can associate an interface with a specific connection policy. This can be done using the ip hotspot policy command in the command-line interface (CLI) or the Web CLI of the router. For example, this association can be applied to Wireguard or Openvpn interfaces.
Here is an example of commands to bind the Wireguard0 interface to Policy0:
ip hotspot policy Wireguard0 Policy0
system configuration save
Instead of Wireguard0 and Policy0, specify the interface and access policy used in your router’s configuration. You can view the configuration using the sh ru command. sh ru command.
If the router uses multiple WireGuard connections, the first one will be named Wireguard0, and the subsequent ones will be named Wireguard1, Wireguard2 and so on. The same applies to the names of access policies (Policy0, Policy1 and so on).
Using multiple ISPs: redundancy and multi-WAN
Netcraze routers support multiple simultaneous uplink connections (this feature is sometimes called Multi-WAN). It is possible, for example, to plug in two Ethernet cables from different ISPs to the same Netcraze router and set up a primary and a backup connection, or you can, for instance, use a dedicated Internet connection via Ethernet for a primary link, and an Internet connection via a 3G/4G, LTE modem as a backup.
Every Netcraze device supports this feature set.
Important
The connection backup (redundancy) mechanism in the NDMS will trigger if at least one of the following occurs:
A link (physical connection) is lost on an active interface;
A Ping Check function determines that an active connection fails the test;
A device administrator turns off an interface.
Each time any of the above conditions are met, the system will switch to the gateway of the next highest-priority available connection with access to the Internet. Please see the 'Connection policies' article for more information on Internet connection priorities and using connection profiles.
Let's take a closer look at the example of connecting a Netcraze router to two different ISPs over a leased Ethernet line and configuring the backup of the main Internet channel.
The primary Internet channel should be connected to the router's blue port 0 (WAN/Internet). The cable of the backup Internet channel can be connected to any of its available ports.
Configure the primary Internet connection according to the instructions in 'Internet connection via Ethernet'. Here, we use automatic IP address assignment:
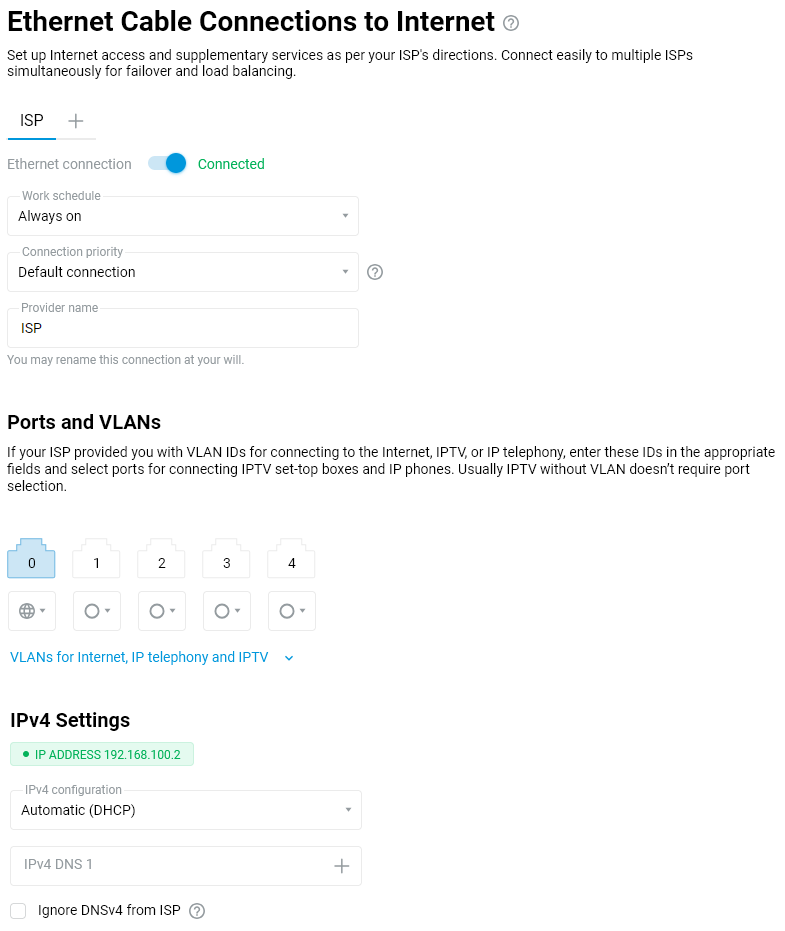
The Ping Check mechanism is enabled on this primary connection. It will continuously test whether the Internet connection is working properly. In the event of a failure of the main network connection, the Netcraze router will automatically switch to the alternate channel. When the main connection is restored, it will return to it. It is recommended to enable Ping Check on the main connection.

After completing the primary connection setup, make sure that the Internet connection has been established.
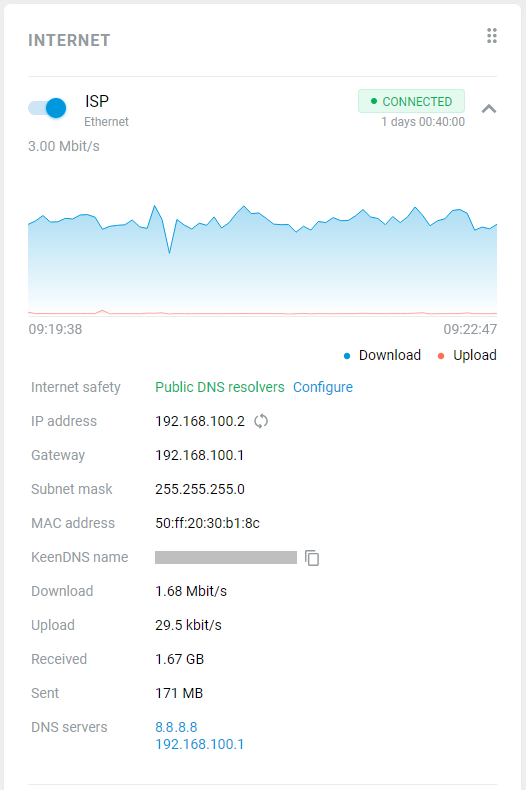
Proceed to set up the backup connection.
In the NDMS, you can reassign any home network port and configure it to connect the ISP's Internet cable (i.e., this port will work as another blue
port 0(WAN/Internet).To connect to multiple ISPs simultaneously, press '+' on the 'Ethernet Cable Connections to Internet' page.
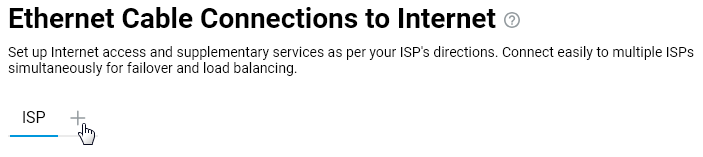
Then set up Internet access according to the conditions of your ISP connection.
For example, we set up a wired backup Internet connection with an auto IP assignment, called 'ISP 2' this time:
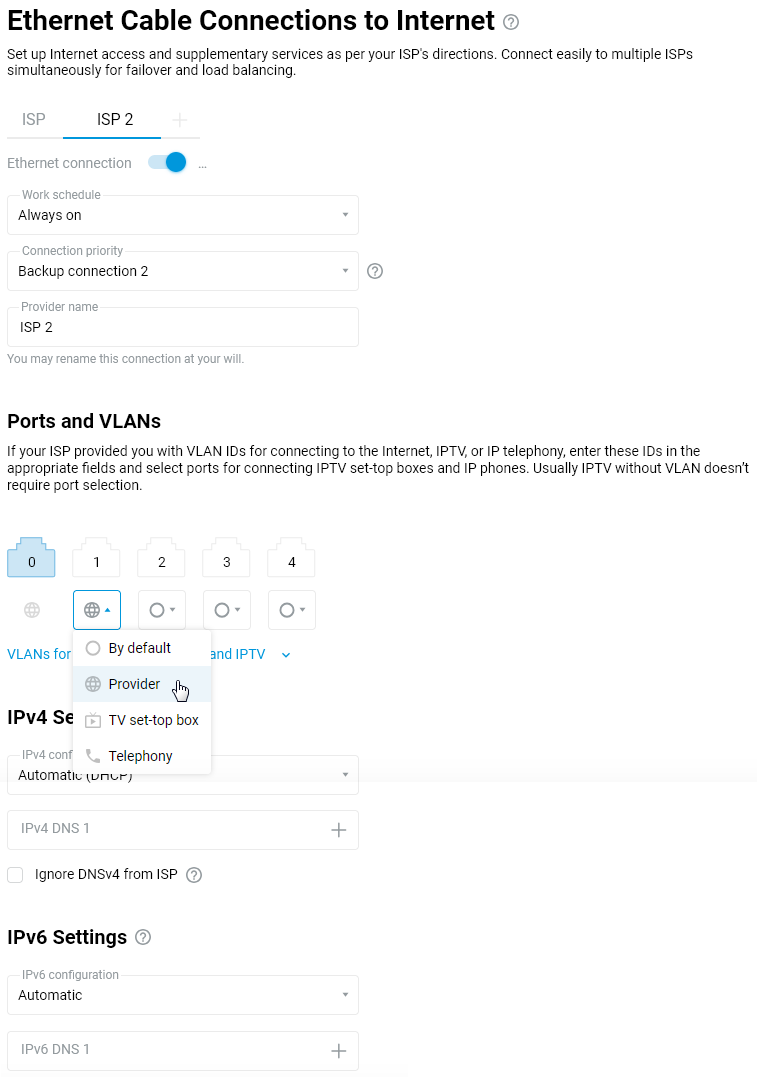
Then connect the Ethernet cable of the second (backup) Internet channel to the port specified in the settings (the
port 1in our example).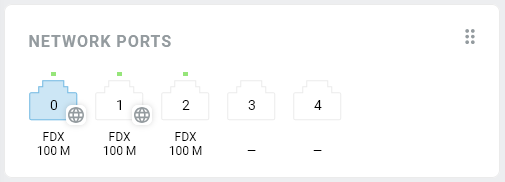
When a Netcraze router is connected to two or more ISPs, you can also set up connection priorities. For more information on that, please see the 'Connection policies' article.
By default, the primary connection is set to a higher priority. Backup connections, that is, ones with a lower priority, will be put on standby (idle until needed).
After we connected two Ethernet cables from different ISPs and thus finished the main Internet channel redundancy setup configuration. The 'System Dashboard' start page will display the currently active connection and the backup connection in the 'Internet' section.
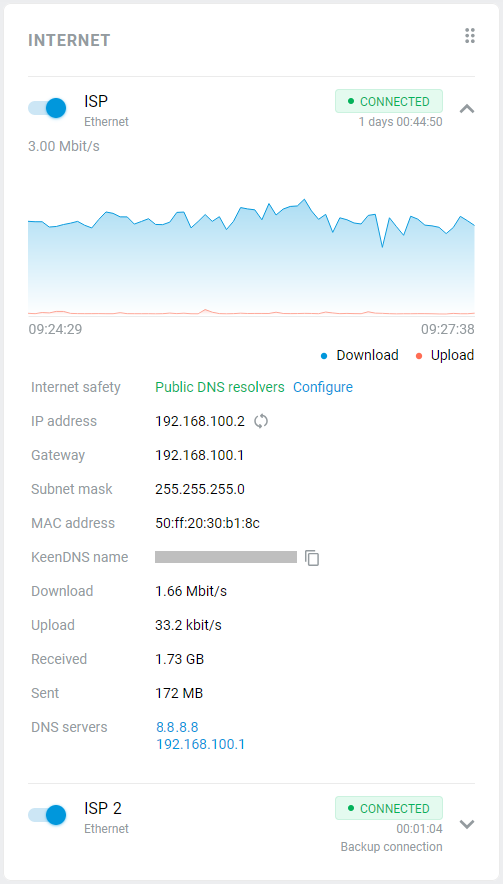
To check the functionality, disconnect the main ISP network cable from the router's blue
port 0(WAN/Internet).The NDMS will automatically switch to the backup channel if the primary connection is impossible to establish.
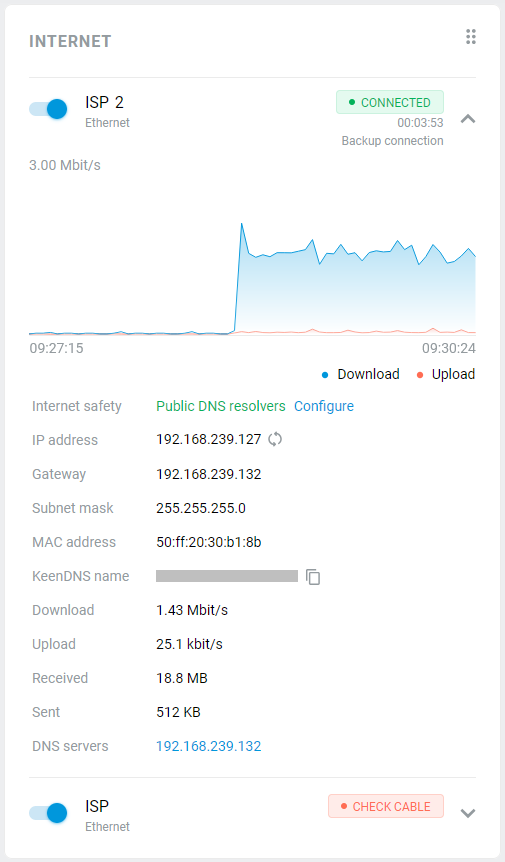
The Netcraze will automatically return to the main channel when the primary connection is restored.
When using Multi-WAN on a router to load balance Internet connections, you can configure the binding of certain devices to different Internet connections using Policy-Based Routing (PBR). Refer to the instructions for more information:
Internet access for specific devices via different connections
Let's assume you have two internet connections (Multi-WAN) on your Netcraze: a primary connection via a leased line and a backup connection via a 3G/4G USB modem. And you need to configure the Netcraze router so that all home devices have internet access from the primary connection and one computer has access to the internet via the backup connection.
This can be done using Policy-Based Routing (PBR) and configuring the router in the Connection policies menu.
The setup process can be summarized as follows:
In the router's web interface, in the 'Connection Policies' page on the 'Policy Configuration' tab, add a new policy and only include a backup connection. Then, on the 'Policy Binding' tab, move the desired device from the Default policy to the newly created access policy. Now the device added to the new policy will access the internet via the backup connection, while the other devices (they are in the Default policy) will work via the default one.
Let's take a closer look at this setting with an example.
The router has two internet connections: the default one via a wireless provider and the backup via a 3G/4G mobile network.
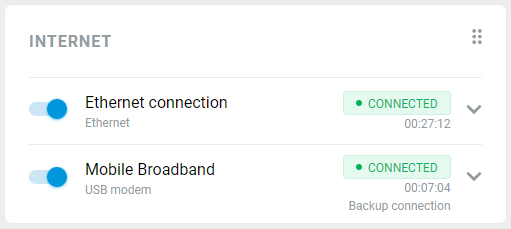
Go to the 'Connection Policies' page. In the 'Policy Configuration' tab, you will see two internet connections (in our example, they are 'Ethernet connection' and 'Mobile Broadband'). Click on '+ Add policy'.
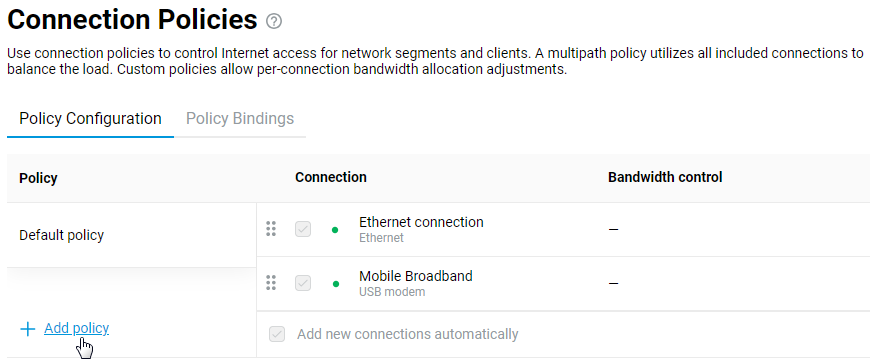
Create a new connection policy, give it a name and click Save.
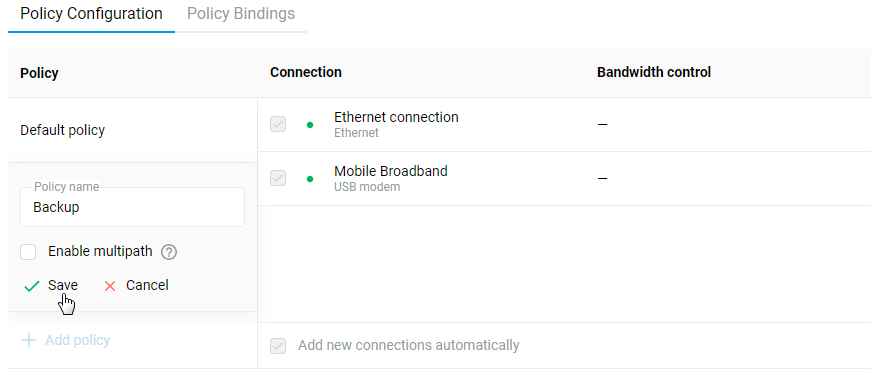
In the newly created policy (in our example, it is a policy called 'Backup'), check the box for the backup connection (in our case, it is 'Mobile Broadband').
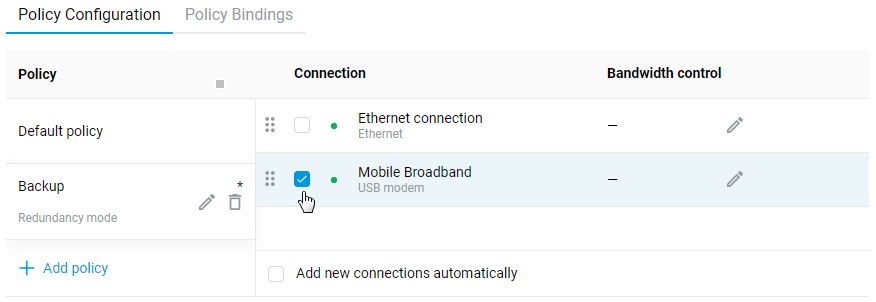
Click on the 'Policy Binding' tab. Click on 'Default policy' to see all local network devices that use this connection policy.
Click on the desired device (in our example, the computer named 'PC'), and in the 'Move to' field, select the newly created policy for the backup connection (in our case, it is the profile named 'Backup') and click 'Confirm'. You can also perform this action in another way: drag and drop the device from the right column to the name of the desired policy in the left column.
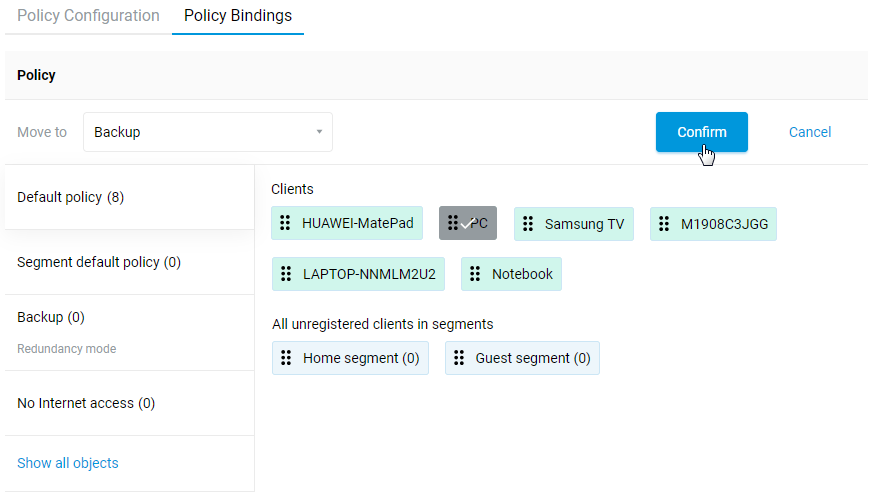
We have now added the desired device to the newly created connection policy, for which only the backup connection is used.
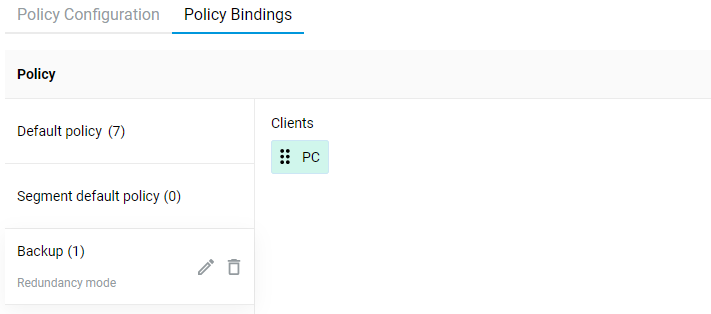
Once the settings have been made, the computer will access the internet via a backup connection (in our example, via the 3G/4G network of the mobile operator), and all other devices on the local network will work via the default connection.
Multipathing (summing the bandwidth of multiple Internet connections)
Starting with NDMS 3.9, smart traffic balancing is implemented when multiple Internet connections are used. In Netcraze routers, this mechanism is called Multipath Mode.
In the router's web interface, you can create a new multipath policy that will optimize the use of several Internet connections and speed up and balance traffic.
In multipath mode, all connections included in the policy automatically transmit traffic. This mode can be used to aggregate the bandwidth of your ISPs.
Note
The most effective balancing will be applied to multi-threaded traffic (point-to-multipoint or one-to-many connections), such as torrent traffic, P2P or other protocols that open multiple connections that do not require keeping the source address. In this case, the connections will be distributed across different connections.
For point-to-point or one-to-one connections, balancing will not work correctly because most hosts will drop packets from the same session if they come from different IP addresses. For example, an Internet site or web service running the HTTPS protocol and opening multiple sessions may refuse to work because if some of the sessions go to different ISPs, it will cause security triggers and errors for the HTTPS protocol.
Multipathing can only work under an optional policy (you cannot enable this mode in the Default Policy). To configure it, follow the steps below:
Connect multiple Internet connections to the router (for example, these can be either wired connections or 5G/4G/3G modem connections);
Important
ISPs should give the Netcraze WAN router IP addresses from different subnets to avoid conflicts.
On the Connection Policies page, add a new policy. Activate the 'Enable multipath' option.
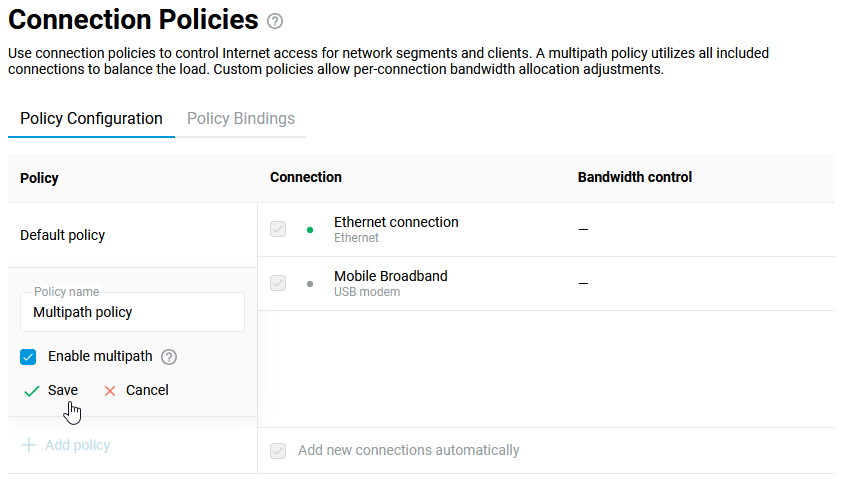
Tick the desired internet connections.
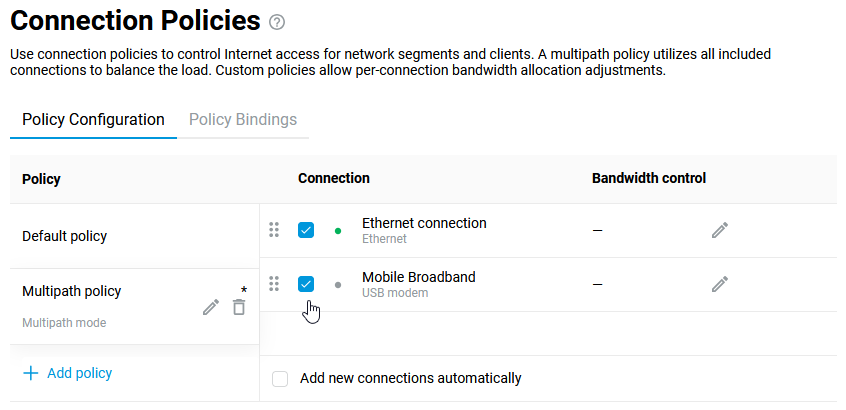
Move the device on which you want to get the aggregated speed of multiple connections to this policy.

Check the functioning of multipath transmission. The easiest way is to start downloading a file via a torrent client on your PC. The device will be able to use several connections simultaneously unless of course both providers block BitTorrent peer-to-peer network protocol (in mobile operators' networks, torrent traffic may not work, or it will be artificially limited in speed).
Note
As of NDMS 3.9, the number of sessions is not distributed in the ratio of ip global priorities but in the ratio of physical interface speeds. So, if you have two Gigabit connections, the sessions will be divided in half. And if the first connection is 1000 Mbit/s and the second one is 100 Mbit/s, the ratio is 10/1. Only the speeds of physical links of the ports used are taken into account. Provider's shaper speed limitations under the tariff plan are not taken into account.
It is important to understand that the number of sessions ratio does not guarantee the speed ratio. These ratios approach each other in case of a large number of homogeneous sessions. If the main load is created by a single session, it can be randomly established through any connection. In this case, the speed will be determined only by the speed of that connection alone.
Another innovation of NDMS 3.9 is the possibility to distribute sessions to connections not only on the IP source / IP destination pair basis but also considering udp/tcp source / destination port. The new distribution mode allows sessions to be established between two identical IPs through different connections, which makes channel utilization more even.
For example, to test bandwidth aggregation, the router uses two 100 Mbps (12.5 Mbyte/s) wired Internet connections from different ISPs. Let's create a policy that supports multipath mode. Let's start downloading the file and in the torrent client we will see that the download speed is summed up from the two Internet connections. In our example we got download speed up to about 179.2 Mbps (22.4 Mbyte/s).
For router old models with NDMS 2.14 - 3.8, you can set up balanced mode connections through the router's command-line interface (CLI). See 'Using multiple WAN connections in load balancing mode (configuring from the CLI)' for a configuration example.
Bandwidth management for Internet connections
Since NDMS 3.8, the speed limit option for incoming and outgoing traffic has been added to the router's web interface on the 'Connection priorities' screen.
This screen allows you to configure connection policies and assign them to devices and network segments. For each connection in the policy, you can specify individual traffic handling priority and incoming and outgoing speed limits. Note that bandwidth management is unavailable for the default policy; this setting is only possible for manually created additional policies.
Important
Currently, bandwidth management only works for IPv4 traffic.
Let's show it with an example. On the 'Connection Policies' page on the 'Policy Configuration' tab, let's add a new policy named speedlimit-10Mbit. In the bandwidth control settings, in the 'Inbound/outbound bandwidth control' fields, we will select 'Manual', and in the 'Limit speed for incoming/outbound data' fields, we will specify the speed in kbps or Mbps. In our example, the speed limit is 10 Mbit/s:
In the 'Policy Bindings' tab, let's add the desired home network devices to the speedlimit-10Mbit policy. To do this, select the connection policy in the left column and then drag the devices to the name of the desired policy in the left column.
Now an Internet connection policy with specified bandwidth will be applied to these devices (in our example, with a speed limit of 10 Mbit/s for incoming and outgoing traffic). Let's test the speed limit using the Speedtest online service, running the test from a computer which has been added to the speedlimit-10mbit access policy:
You can find more information in the article 'How to measure the Internet connection speed?'.
You can also set up bandwidth management for multiple Internet connections at once. For example:
IPv6 connection options
Connecting to the Internet via IPv6
To connect a Netcraze router to the Internet via IPv6 protocol, you need no special settings. In most cases, it is sufficient to enable IPv6 in the settings of the external interface you will use for the connection.
Important
For IPv6 connections to work through the router, the ISP must assign an address with the network prefix /48, /56 or /64 to allow delegation of the prefix to the home network. Otherwise, the IPv6 connection through the router will not work.
Some ISPs provide only one IPv6 address without a prefix delegation. Such parameters are designed to connect only one host and will not work through a router.
Mobile operators' USB modems do not support the delegation of prefixes. IPv6 via 3G/4G modem will work only when connected directly to a computer and with one host only.
See the Note section at the end of the article for information on how to find out if a prefix was received.
To set up an IPv6 connection, proceed as follows:
For simple IPoE access with a DHCP server, you only need to enable IPv6. You can do it on the Ethernet Cable Connections to Internet page. In the IPv6 Settings section, set the Automatic or Manual in the IPv6 configuration field. Set to Disabled to disable IPv6.
If you are using an authentication connection (PPPoE, PPTP or L2TP), go to the Ethernet Cable Connections to Internet page and under ISP Authentication, click Show advanced settings.
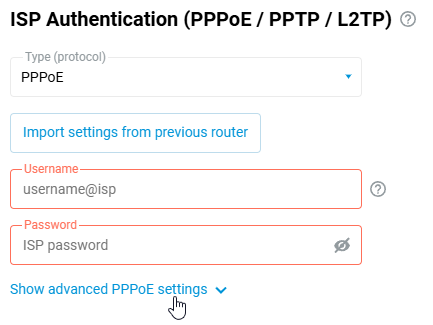
In the settings that appear, in the IPv6 configuration field, set the Automatic or Manual.
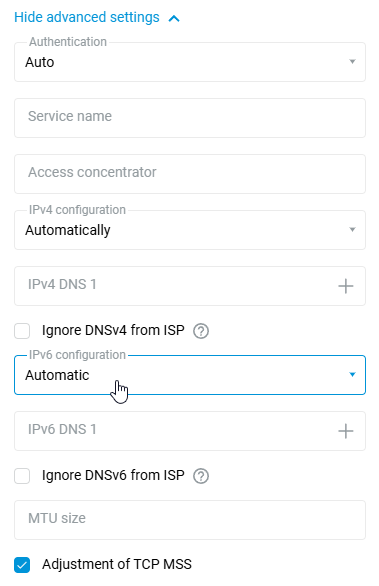
After performing the steps above, the Netcraze device should automatically obtain an IPv6 address and DNS servers from the ISP.
On your computer, check whether Internet resources will be available via IPv6.
For example, at the Windows command line, run the command:
ping ipv6.google.com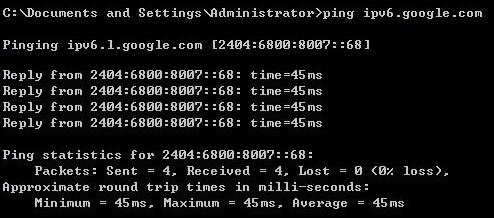
Note
You can view a list of current IPv6 prefixes in Netcraze's command-line interface (CLI) using:
show ipv6 prefixesFor example:
(config)> show ipv6 prefixes

prefix:
 prefix: 2a02:2698:24::/64
 interface: PPPoE0
 valid-lifetime: 86349
 preferred-lifetime: 3549
Or take a look at the system file self-test.txt in the subsection show ipv6 prefixes. For example:
<!-- show ipv6 prefixes -->
 <prefix>
  <prefix>2a02:2698:24::/64</prefix>
  <interface>PPPoE0</interface>
  <valid-lifetime>86349</valid-lifetime>
  <preferred-lifetime>3549</preferred-lifetime>
 </prefix>
In our example, the ISP delegated the /64 prefix. The /64 prefix allows using IPv6 addresses only within one segment (for example, only for the Home segment). The /48 prefix allows you to use IPv6 addresses in different segments (for example, in the Home and Guest segments, and additional segments).
Receiving an IPv6 address on the WAN interface is optional. For a router to work with IPv6, the ISP must provide a prefix rather than an IP address.
Here is an example of parameters when the ISP delegated only an IPv6 address without a prefix. In this case, the connection through the router will not work.
<!-- show ipv6 prefixes -->

<!-- show ipv6 addresses -->
 <address>
  <address>2a00:1370:8024::</address>
  <link-local>fe80::5a8b:f3ff::</link-local>
  <interface>ISP</interface>
  <valid-lifetime>infinite</valid-lifetime>
 </address>
An IPv6 connection with Hurricane Electric tunnel broker
IPv6 over IPv4 tunnels are used to access Internet resources over IPv6 protocol when your public address is IPv4. To set up your connection, register with an IPv6 virtual provider (tunnel broker) running 6in4 technology. You will get the connection settings when you register.
Important
The requirements for connecting to an IPv6 Tunnel Broker are as follows:
a static public IP address on the external interface;
ping to the router from the Internet must be allowed: your ISP should not block incoming ICMP packets, and you have to create a Firewall rule to respond to ping requests on Netcraze.
Go to the tunnel broker's page Hurricane Electric.
Click the 'Register' button to enrol in the service.
In the 'IPv6 Tunnel Broker Registration' window, enter the required information and click the 'Register' button.
To create a tunnel, click on the 'Create Regular Tunnel' link.
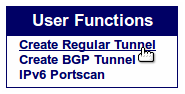
In the 'Create New Tunnel' window, enter the static public IP address of the Netcraze in the 'IPv4 Endpoint (Your side)' field. You can check it in the web interface on the 'System dashboard' page.
In the 'Available Tunnel Servers' table, select the tunnel server. You can choose the server closest to you by territory or keep the one automatically selected. Press the 'Create Tunnel' button to continue.
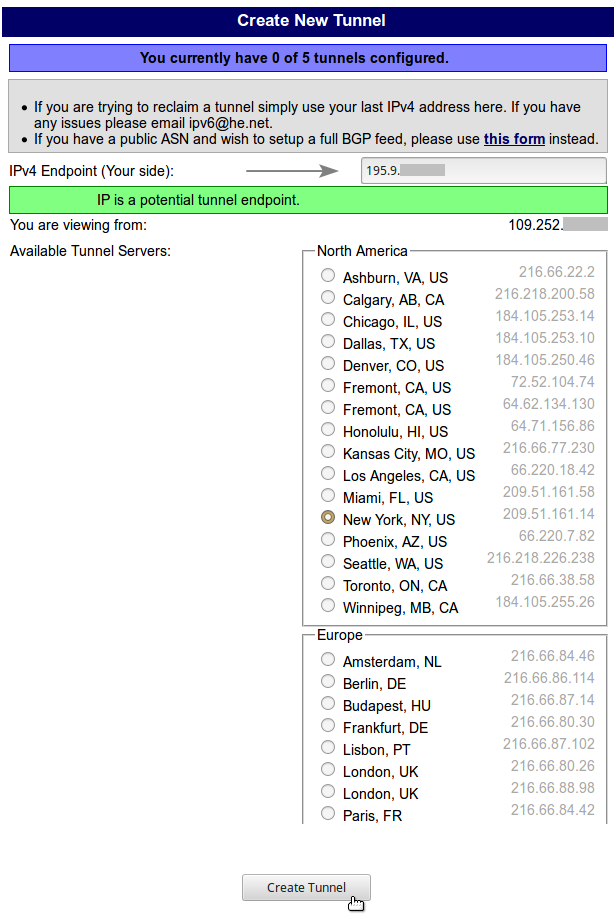
Then, in the 'Configured Tunnels' section, click on the link of the created tunnel for detailed information about the IPv6 tunnel.
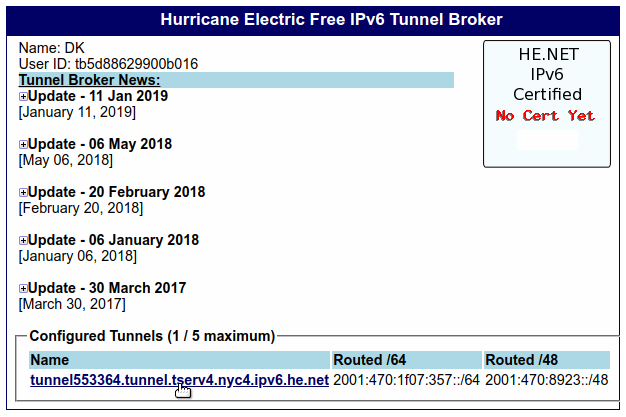
The 'Tunnel Details' window on the IPv6 tab provides all the necessary information to configure an IPv6 tunnel over IPv4 in the Netcraze.
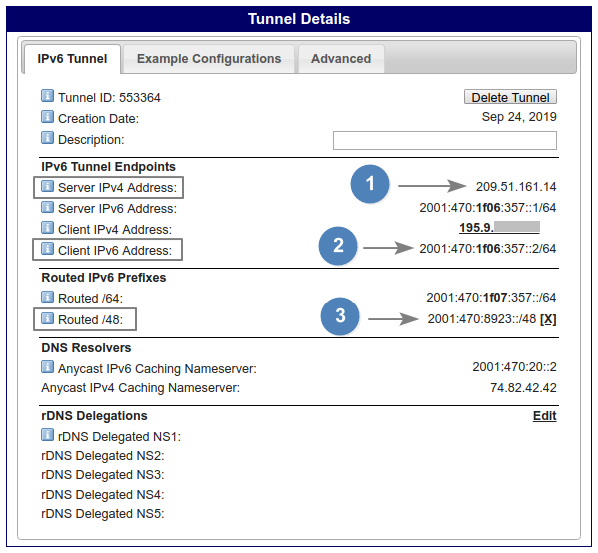
'Routed /48' does not immediately display prefix information. To get the prefix, press 'Assign'.
You'll need the following information:
Server IPv4 Address
Client IPv6 Address
Routed /48 (IPv6 prefix)
Connect to the Netcraze Web Interface.
To work with the IPv6 protocol, you should install the 'IPv6' system component on the Netcraze. Make sure that you did it. Check it on the 'General System Settings' page in the 'Updates and component options' section by clicking on 'Component options'.

Then go to the 'Other Connections' page, and in the 'IPv6 in IPv4 Tunnels' section, click 'Create connection'.
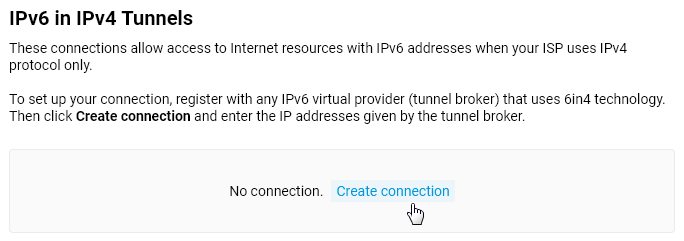
In the 'Connection Settings' window, be sure to enable the 'Use for accessing the Internet' option. In the 'Connection name' field, specify any name to describe the connection. In the 'IPv4 address' field, you should enter the server address for connection (specified in the broker's control panel in 'Server IPv4 Address'). In the 'IPv6 address' field, insert the client address specified in the control panel in 'Client IPv6 Address' (add the address without the
/64 prefix). And in the 'IPv6 prefix' field, insert the address from 'Routed /48'.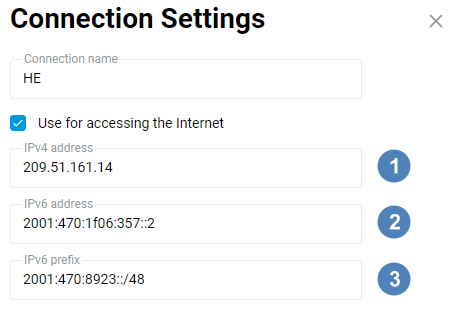
Click 'Save' to save the router configuration.
On the 'Other Connections' page, to activate the tunnel, set the switch to the 'On' state.
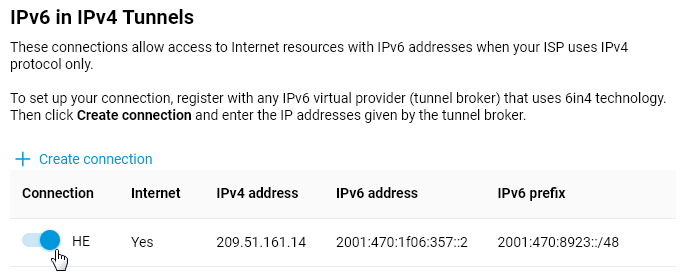
Warning
Starting with NDMS
4.0, changes have been made to the implementation of IPv6 over IPv4 connections. Now, for this type of tunnel to work, it is necessary to raise the priority of the IPv6 connection on the 'Policy Configuration' tab, 'Connection priorities' page.To check the connection, go to the 'Diagnostics' page; in the section 'Network Connection Test', put the switch to 'Ping IPv6' and click 'Start the test'.
If you successfully connect to a tunnel broker, the ping results must have no packets lost (
0% packet loss). All packets must be sent (5 packets transmitted) to the host, and the host will reply (5 packets received).
Advanced configuration options
Internet availability checking (Ping Check)
A Netcraze router allows you to connect to multiple ISPs simultaneously (called Multi-WAN) and enable continuous Internet availability verification (Ping Check). Ping Check detects whether an Internet connection is available by polling a given network host. If the primary ISP's network fails, the router will automatically connect to the backup channel.
You can configure Internet availability checks for wired IPoE connections (including the ones with the authentication at the ISP: PPPoE, PPTP and L2TP), as well as WISP, ADSL / VDSL. But especially the Ping Check feature will be helpful if you have an Internet connection via a 3G/4G USB modem.
Important
Netcraze routers can manage the power supply of USB modems without user assistance. The fact is that many modern modems are standalone devices that launch and operate separately from the router. On the one hand, this is good. But on the other hand, many compact USB modems are designed primarily for episodic work in laptops, but not for round-the-clock work, on which they can fail or hang. With the help of the Ping Check function, your Netcraze will find out by itself that the Internet is not available for some reason and will automatically hard reboot the modem for the connection to appear again.
You do not need to care about configuring Ping Check. All you need to do is connect the supported USB modem to the Netcraze and ensure that it is detected and ready for operation (this can be done in the web interface on the System Dashboard page). The Ping Check function is activated automatically when a USB modem is connected to the router. It will use the Automatic mode as a check method.

This mode is designed to simplify the Ping Check function setup for ordinary users (those who do not want to learn about the additional parameters). It checks the availability of hosts google.com, facebook.com, yahoo.com on the port TCP/443 (HTTPS). ISPs do not block this port as a rule. If there is no connection to the hosts, the router will try to reconnect by restarting the modem interface, or if there is a backup connection, it will automatically reconnect to the backup channel.
In addition to the default functionality, it is possible to configure the Ping Check function by yourself. In addition to the Automatic mode, 3 more options are available: ICMP echo (Ping), TCP/TLS port check and TCP port check. For details, refer to the instruction Ping Check fine-tuning.
Ping Check fine-tuning
Important
This article provides information for advanced users.
Implementation of the Ping Check function in the web interface of a Netcraze router supports flexible configuration.
Important
We recommend using the Ping Check function on the primary connection, which has a higher priority than the backup connection. Generally, you don't need to additionally enable the Ping Check on the backup connection because when the primary connection is restored, the router will switch the default gateway back to the one with the highest priority.
For information on priorities, see Connection policies.
Ping Check can be configured for wired IPoE connections (including those authenticated with an ISP using PPPoE, PPTP and L2TP protocols) and 3G/4G, WISP, ADSL / VDSL.
On the connection page, under Check the availability of the Internet (Ping Check) in the Mode field, you can manually specify which check requests to use — ICMP or TCP.
There are 5 options available:
Automatic
ICMP echo (Ping)
TCP/TLS port check
TCP port check
Disabled
'Automatic' mode
It is designed to make it easier for ordinary users (those who do not want to know about additional parameters) to set up the Ping Check function.
It checks the availability of google.com, facebook.com, yahoo.com nodes on the TCP/443 (HTTPS) port. Service providers do not block this port as a rule. The check interval is 10 seconds. The minimum number of successful attempts to switch from the Off to the On state is 5. The number of unsuccessful attempts to switch from the On to the Off state is 5.
Important
Some USB modems may require more time to establish connection than it is defined in the Automatic profile. If you see your modem continuously rebooting, try to set Ping Check manually using the ICMP echo (Ping), TCP/TLS port check or TCP port check mode and selecting the required value in the Check interval field.
'ICMP echo (Ping)' mode
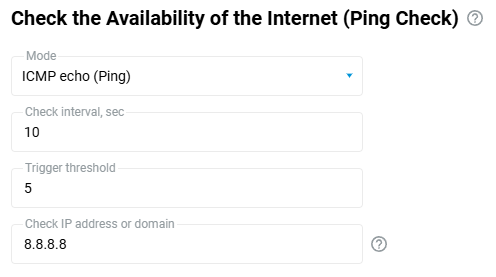
In the Check interval (time in seconds between checks) and Trigger threshold (number of unsuccessful tests) fields, the default values are 10 and 5, respectively.
Note
For an Ethernet connection, the optimal values for Check interval and Trigger threshold are 5 and 3, respectively.
In the Check IP address or domain field, enter the host's IP address or its domain name, the response from which will serve as the network access criterion. For example, you can use the address of a reliable fail-safe DNS server (our example shows the IP address of a public DNS server from Google). We recommend that you specify the IP address to avoid DNS-related problems.
Important
Switching to a backup connection or rebooting of the 3G/4G modem will occur after exceeding the number of failed checks specified in the field Trigger threshold.
Tip
Some ISPs allow ping (ICMP requests) to some public DNS servers (e.g. Google 8.8.8.8, 8.8.4.4 DNS servers) or their DNS servers, even when Internet access is blocked. We recommend that you specify an IP address (server) that is always available on the Internet and stops answering only when there is no access to the network.
When using the ICMP echo (Ping) mode and specifying public servers (services) as the IP address to check Internet availability, there may be delays in responding to ping. The waiting time for a response to a request from the server is 10 seconds. If the reply is not received after this time, the router considers the request unsuccessful and sends the next request. This value is constant.
In the Check interval field, you can specify the interval between checks. The starting point for the second and further requests is the time of receiving the previous response (or the waiting time for the response has expired), not the time of sending the last request. For example, 0 sec — the first request is sent, in 3 sec — the first response is received (it can wait up to 10 sec), then the waiting time specified in the Check interval field (10 sec by default), i.e. 3+10=13 sec — sending the second request, etc. Thus, there cannot be any conflict of timing (when the request is sent earlier than the previous response).
If there are constant delays in responses from some public server, it is not recommended to excessively increase the check interval and trigger threshold, as this may cause blocking of traffic on the server side. It is preferable to choose the address of another resource, which is permanently available on the Internet, and that will not cause significant delays in response to ping.
'TCP/TLS port check' mode
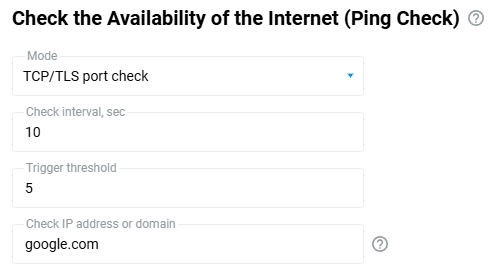
The TCP/TLS port check mode improves the operation of the Ping Check mechanism to provide protection against Internet access failures. This mode will prevent false positives when the ISP redirects traffic to an authorised portal, such as its billing service.
We recommend that you specify the IP address to avoid DNS-related problems:
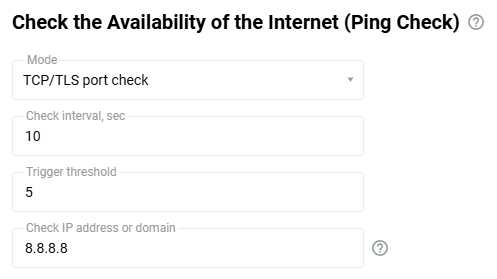
'TCP port check' mode
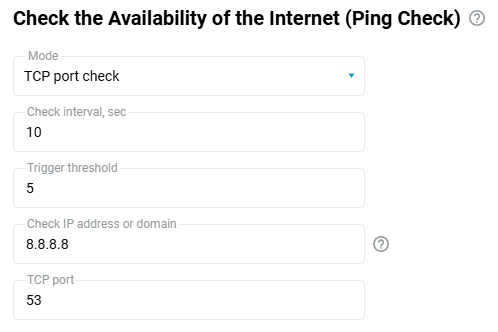
In the Check interval (time in seconds between checks) and Trigger threshold (number of unsuccessful checks) fields, the default values are 10 and 5, respectively.
Note
For an Ethernet connection, the optimal values for Check interval and Trigger threshold are 5 and 3, respectively.
In the Check IP address or domain field, enter the IP address of the host or its domain name that you want to check for availability. For example, you can use the address of a DNS server (in our example, the IP of a public DNS server from Google is specified). We recommend that you enter the IP address to avoid DNS-related problems.
In the TCP port field, specify the number of the TCP port that will be used to check Internet availability. The TCP/53 (DNS) port is used in our example.
'Disabled' mode
If you want to disable the Ping Check mechanism, set Disabled in the Mode field.

How to ignore your ISP's DNS
Usually, an ISP automatically provides its users with their domain servers (DNS). Still, you may need to stop using these servers and replace them with public DNS or VPN provider addresses in some cases.
Starting with NDMS 3.1, you can enable the option to ignore (disable) DNS servers automatically received from your provider in the web interface. This option is available for connections on 'Wired' page (enabling PPPoE/PPTP/L2TP), 'Wireless ISP', 'DSL connection'.
Let's look at an example. In the router's web interface, on the 'System Dashboard' page in the 'Internet' panel, in the 'DNS servers' line displays the DNS addresses automatically received from the ISP, and additional servers specified manually. In our example, the DNS server 192.168.100.1 is obtained from the ISP, and the addresses 8.8.8.8 and 8.8.4.4 are added manually.
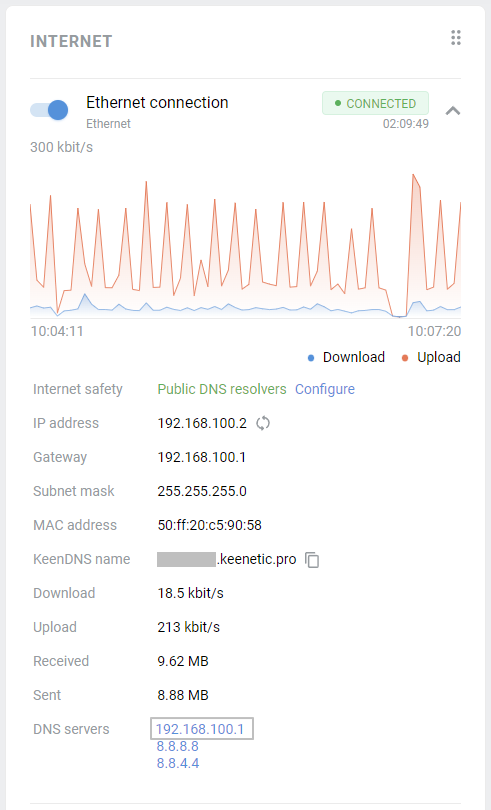
Enable the 'Ignore DNSv4 from ISP' option on the 'Ethernet Cable Connections to Internet' page. It blocks the use of DNS server addresses received via DHCP for the current connection.
When using an IPoE connection (without authentication) or with authentication via PPPoE/PPTP/L2TP protocol, you can find this setting on the 'Ethernet Cable Connections to Internet' page in the 'IPv4 Settings' section. The settings for WISP and ADSL connections are on the respective 'Wireless ISP' and 'DSL connection' pages.
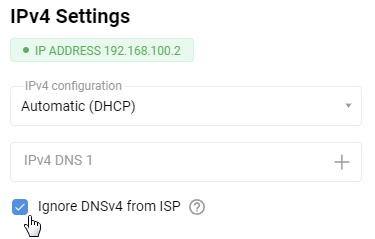
Important
Once you enable 'Ignore DNS' and save the settings, you will automatically reconnect to your ISP (disable and enable the Internet interface).
After disabling DNS, the 'DNS servers' line on the 'System Dashboard' page will no longer display the addresses automatically received from the ISP.
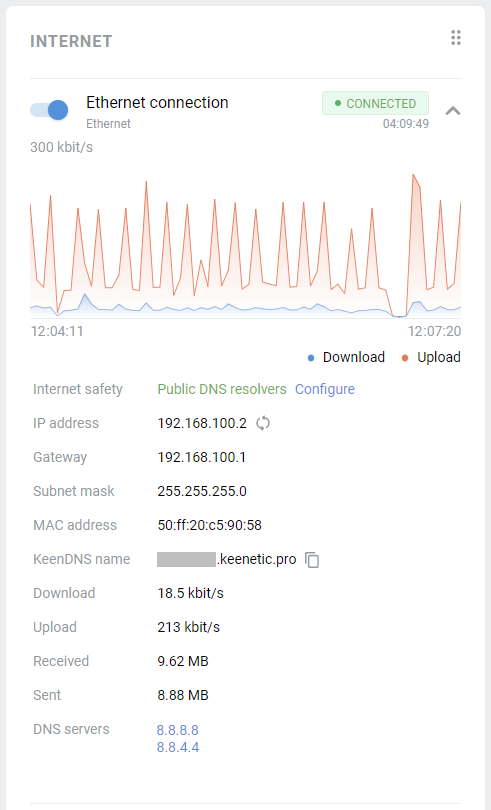
Important
Different ISPs have various network configurations. Disabling the addresses of the DNS provider may lead to tunnel connection failure (PPPoE/PPTP/L2TP), disruptions in the operation of additional services, and others. Before you ignore the DNS provided by your ISP, make sure that the settings do not include the domain names of the servers that authenticate your connection. If they contain a server address in the domain name format, such as l2tp.aa.net.uk, in this case, you cannot disable DNS on the connection that is used to connect to the authentication server. Usually, it is a 'Wired' connection (ISP), as this will make it impossible to determine the server's address providing access to the Internet.
Tip
If one of the Internet filters (SafeDNS, AdGuard DNS, etc.) is enabled in the router settings, all DNS requests will be sent to the service addresses. In this case, the provider's DNS servers, and additional manually added ones will not be used.
If the router settings use DoT/DoH servers, they are not displayed on the 'System dashboard' page in the 'DNS Servers' line. When the ISP's DNS is disabled, the DoT/DoH service addresses will be used.
You can find more information in the 'Using public DNS servers' article.
Standby (On demand) mode for backup connections
By default, a backup connection for Internet access is always in the connected state. This maximises the speed of switching to a backup connection if the main connection fails.
If the user prefers that the router only initiates a backup connection to the operator when the main channel fails, then the backup channel needs to be set to Standby (On demand) mode (available from NDMS 4.0 and higher). In this case, it takes longer to switch to Standby (On demand), but there are advantages in this mode. This mode is available for Internet connections via a 5G/4G/3G modem (via a mobile network) and Wireless ISP (WISP).
Examples of when it is advisable to use this option:
According to certain tariffs, your operator can deduct funds from the user's balance for the fact of connecting to the network at least once a day for a few seconds;
If the standby channel is always active, service traffic is being received and transmitted, and cellular operators can charge the subscriber based on the traffic;
Less power consumption of 4G modems in Standby (On demand) mode;
In WISP mode, disabling continuous scanning of the airwaves for the specified access point will result in the backup connection only working when the primary connection is unavailable.
Standby (On demand) mode can be set for backup modem connections and WISP via the web interface in the Connection type section, and Ethernet cable connections (via CLI only).
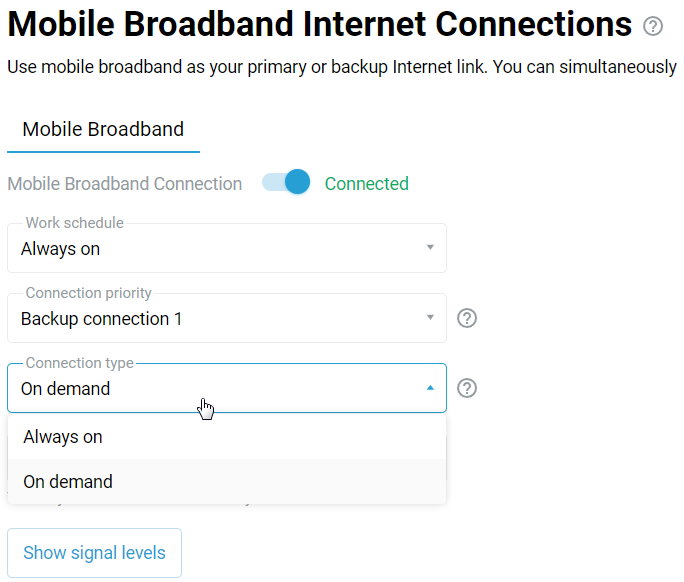
The Standby (On demand) mode is not in use:
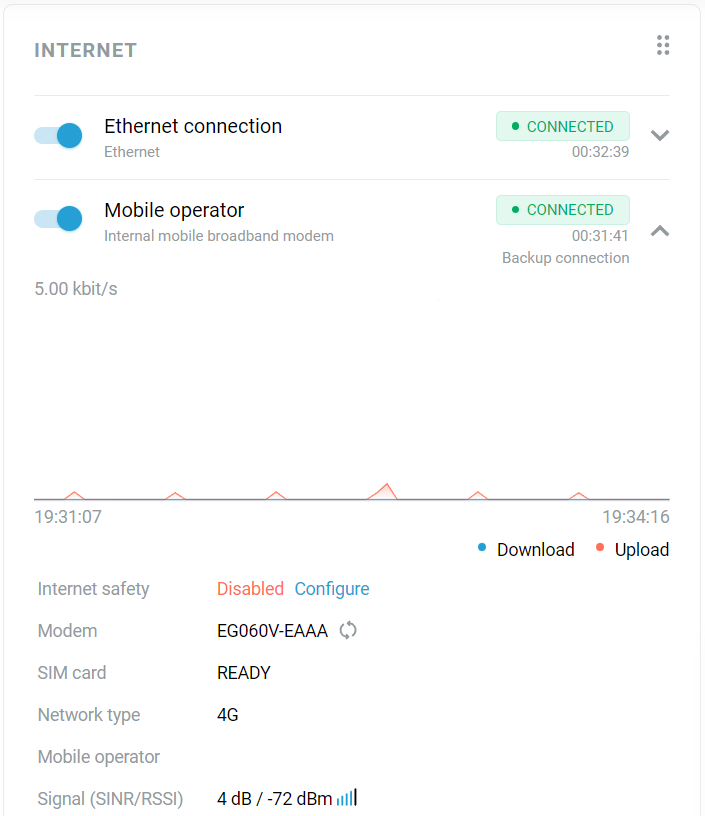
The Standby (On demand) mode is on:
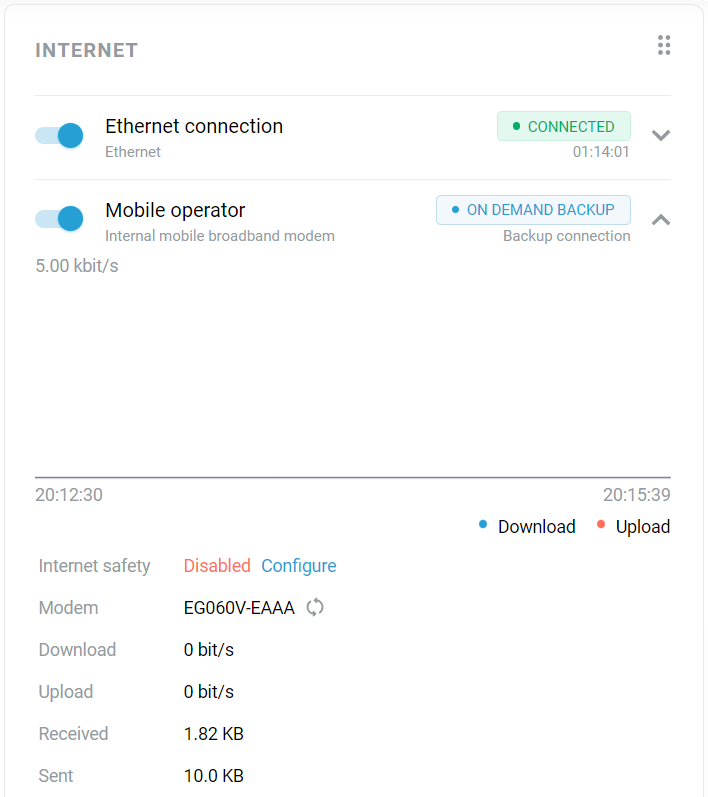
Tip
In the Wireless ISP connection settings, there is a Retry timeout field that sets a timer for connection attempts to the Wi-Fi access point. The default setting is 600 seconds (10 minutes). Connection attempts will be made on demand, but if a connection cannot be established within the specified time, the system reverts to standby mode until the next change to the internet access configuration.