Access point wall mounting information
Using the supplied mounting kit, the Orbiter 6 (NAP-630) access point can be installed on a wall, as well as on a solid or suspended ceiling.
Up-to-date information on mounting the access point can be found in the Quick Start Guide. The manual is available in PDF format on our website in the Download Center section.
Wall-mounting template showing the distance between the mounting holes for your Netcraze model:
Tip
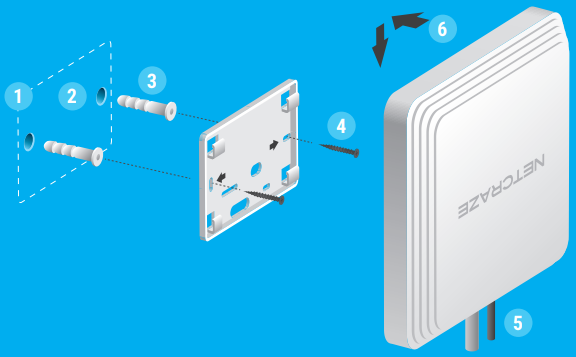
Mounting to a wall or solid ceiling
Place the mounting bracket in the desired position. Ensure that the installation does not interfere with existing electrical or network wiring.
Mark two screw hole positions. Drill a
6 mmdiameter hole in each of the marked spots.Insert the ribbed plastic wall plugs into the holes. Or, for a drywall surface, screw the drywall anchors in with a screwdriver.
Secure the mounting bracket to the wall or ceiling by driving the self-tapping screws into the anchors.
Connect the Ethernet cable and, if necessary, the power adapter to the access point.
Attach the Keenetic Access Point to the mounting bracket and move it in the direction of the arrows until it locks into place.
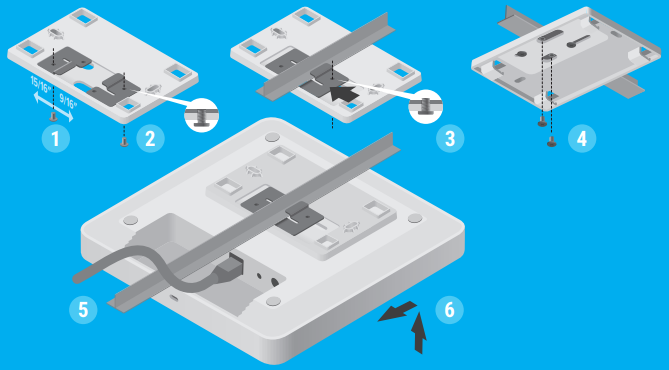
Mounting to a suspended ceiling using T-rails
Secure the first T-rail clip to the mounting bracket with a screw. Depending on the T-rail size, use the
9/16" (14.3 mm)or15/16" (23.8 mm)position.Hook the second T-rail clip to the mounting bracket. Do not tighten the screw at this time.
Position the mounting bracket on the T-rail by placing the first T-rail clip on the rail base and pushing the second clip toward the rail base. Tighten the second screw.
Secure the mounting bracket to the T-rail with the two remaining screws.
Connect the Ethernet cable to the access point.
Attach the Keenetic Access Point to the mounting bracket and move it in the direction of the arrows until it locks into place. Adjust the cables so that the exposed parts are hidden behind the case.